Create different Request queues for all of the emails that go to your shared company addresses, such as support@, info@ or sales@company.com. Segment messages from each shared email address so it's easy for your team to find the work relevant to them. By working out of a central inbox, you can prevent any trip-ups, forgotten emails or doubling up.
Using this guide, you can:
Create a Request Type
Capture email messages from your shared company addresses by setting up a Request Type. Each email can be configured to its own Request queue by setting up each email as a Request Type.
Create a Request Type so that Accelo begins capturing requests from your clients.
To create a Request Type:
-
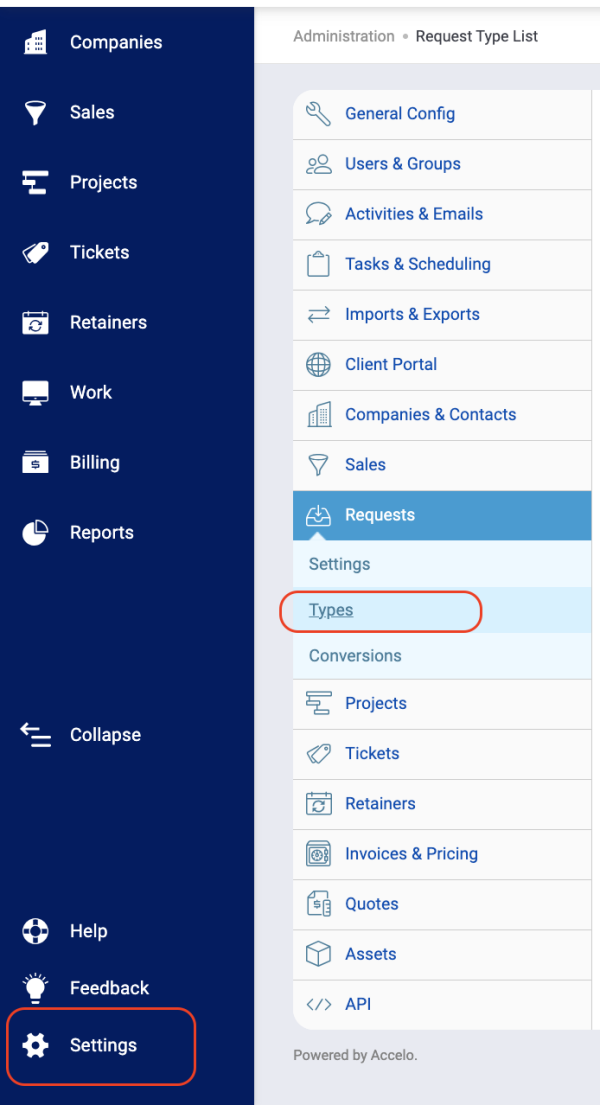
Click the Settings on the bottom left of Accelo.
-
Choose Requests and select Types.
-
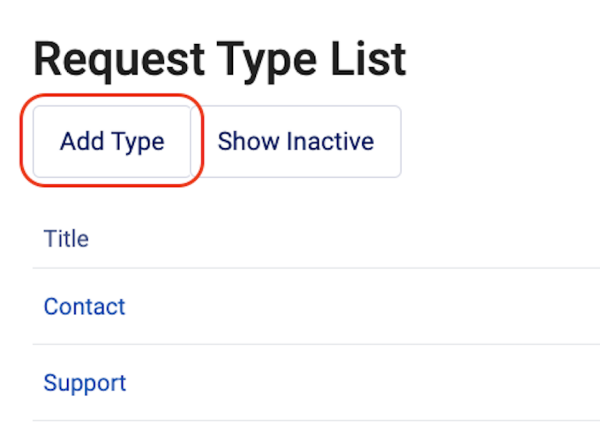
To create a new request type, click the Add Type button at the top left.
-
Edit existing Request Types by clicking on the Request Type Titles, or Edit button on the same line. On the following page, you are presented with a few Request Type Configuration options to determine how Requests are captured.
Request Type Configuration
Set up automatic capture for your company email addresses. If there are new inquiries coming into sales@company.com or support@company.com, you can have them automatically queued in your Requests Module.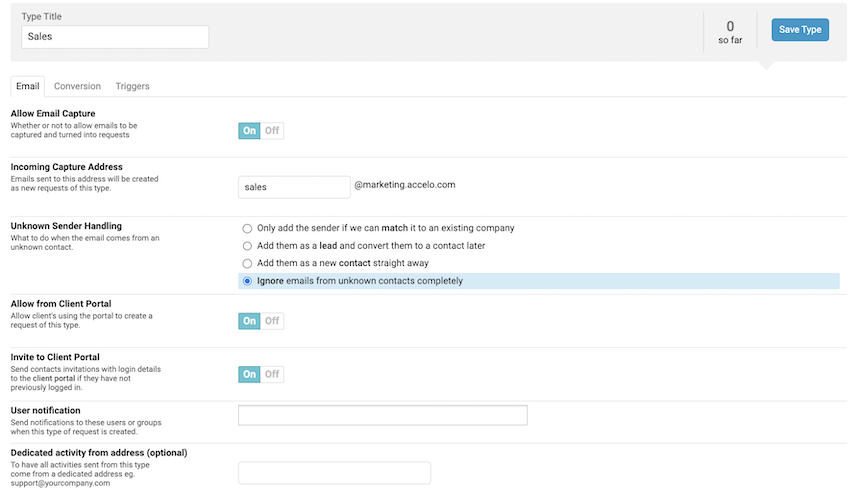
You have several options when configuring your Request Types:
-
Request Type Title: Internally categorize requests you receive at this address (such as Support, Sales, Info, etc). This categorization will be noted next to the Request itself and under the Requests heading.
-
Allow Email Capture: Determines whether requests sent to this address are captured within Accelo. This should be turned ON to start pulling in emails to this Request Type.
-
Incoming Capture Address: Define the email address alias that you'll be forwarding your emails to. We recommend keeping this alias simple and descriptive, such as making the Support Requests alias "support." You can find more information on how to configure your email forwarding in the email forwarding section below.
-
Unknown Sender Handling: Accelo auto-captures all requests that come from email addresses associated with existing contacts, ie - contacts that have been entered in your Accelo account. This Unknown Seder Handling option allows you to determine how requests from unknown addresses are treated.
- Only add the sender if we can match it to an existing company - Add unknown senders if their email domain matches a company record in your account. Emails from all other unknown senders will not be captured.
NOTE: This option will only work if there is a single company domain that matches. If there are multiple Companies with the same Domain, the email will not be captured. -
Add them as a lead and convert them to a contact later - All unknown senders will be added as “Leads”, giving you the opportunity to review their details before adding their email address to be captured. This is the option we generally recommend, since this guarantees all emails will be captured.
NOTE: Replying to a lead will auto-convert that lead into a Company/Contact. -
Add them as a new contact straight away - Adds all unknown senders as contacts right away. You will not receive notifications nor need to review their details before Accelo auto-creates their email address as a contact.
-
Ignore emails from unknown contacts completely - Ignores all email requests from unknown senders.
- Only add the sender if we can match it to an existing company - Add unknown senders if their email domain matches a company record in your account. Emails from all other unknown senders will not be captured.
- Allow From Client Portal: Allow clients to to make a request through to client portal for this Type
- Invite to Client Portal: Send clients invitations with login details to the client portal if they have not previously logged in.
-
User Notification: Designate who you'd like to receive a copy of new Requests. Choose both individuals and groups.
-
Dedicated Activity From Address: When your staff responds to Requests, their replies will come from their personal staff address by default. If you prefer to have a unified default email, such as all responses coming from support@yourcompany.com, enter your preferred email address in this field. Many users choose this to be the same email as the Incoming Capture Address.
Set up Autoreply
Create an email notification to automatically send an email to anyone who submits a Request. Prevent concerned customers wondering if their support email got through to you.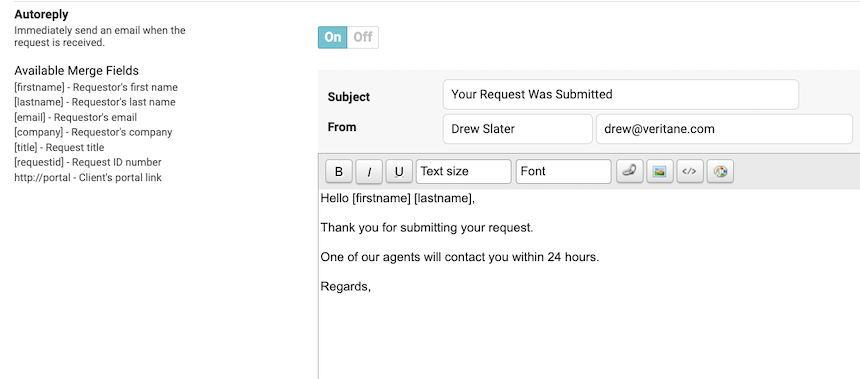
Each option when setting up your Autoreply will appear once you turn your Autoreply option to ON.
-
Subject: The email subject to be used in the automatic reply.
-
From Name: The person's name that will be used in the automatic reply. This can be an individual name, such as "John Smith," or a company division, such as "Accelo Support."
-
From Email: The email address that this automatic reply will come from. We recommend making this the same as the email address that your clients initially contacted.
-
Text: Enter the content of your automatic reply here; we also include several fields that you can use to customize these automatic replies to each client:
-
[firstname] - Requestor's first name
-
[lastname] - Requestor's last name
-
[email] - Requestor's email address
-
[company] - Requestor's company name
-
[title] - Title of the client's request, which is typically their email's subject
-
[requestid] - The ID # of the client's new request for internal tracking
-
http://portal - Creates a link directly to the client's Client Portal page
-
Requests Within the Client Portal
Requests can be submitted via email and the Client Portal. By default, Request Types have already been created for Support (both via email and via Client Portal) and Sales.
Client Portal requests are automatically captured and require no additional configuration on your part. Read more about configuring your Client Portal.
Forwarding Your Email to Requests
Ensure your clients' requests are sent to Accelo. Requests submitted via the Client Portal will be captured automatically, but email requests will need to be forwarded to Accelo. This requires some configurations on your own email provider.
To forward your email to Requests:
-
Forward your public addresses to their corresponding Incoming Capture Address. For example, your support@demo.com address should forward emails to your support capture account.
-
Your capture address is unique to your account and request type. You can find your request capture address under Configuration > Requests > Types > and Choose the Request Type you wish to configure.
Find the Incoming Capture Address on the Edit Request type screen.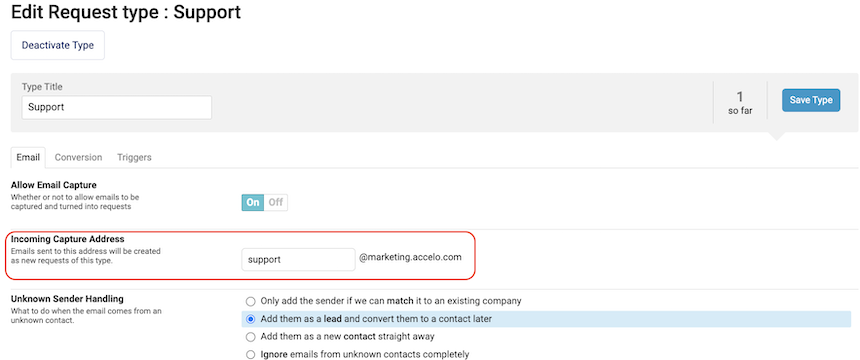
Verifying Your Forwarding Rule
When setting your email account to forward incoming email to another address, such as a request's capture address, your email account will send a verification email to the new forwarding destination. That verification email includes a special link which you can click to verify that you have access to the account, and is required before email can be forwarded to a new address automatically. Unlike a normal email inbox, the request inbox does not capture and store these verification emails. Instead, when a verification email is sent to Accelo, that email is automatically returned to the address which originally sent it - attempting to verify forwarding from support@yourdomain.com to support@yourdeployment.accelo.com will automatically return the verification email to support@yourdomain.com The verification link can then be clicked from the original inbox to verify forwarding.
Testing Your Request Inbox
To test your requests, send an email to your public email address (support@yourdomain.com), and then check Requests for the message. Messages can take up to five minutes to be recorded during high traffic times.
Please see help guides on their knowledge bases below to set up auto-forwarding -
You will then need to set up a forwarding rule in your external email platform. Follow the relevant guide below to configure email capture:
NOTE: Emails which are sent from staff email addresses will not be captured as a new request. Requests are only captured when they're sent by your contacts.
Request Inbox Subscriptions
-
Hover over the Inbox button in the main toolbar to see your current Request Inbox Subscriptions.
-
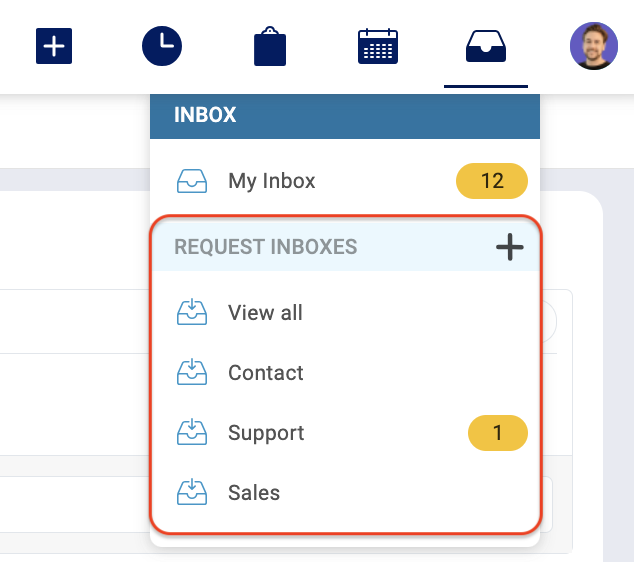 To add other Request Inboxes, hover over your User Profile icon, then select Preferences in the dropdown menu.
 -
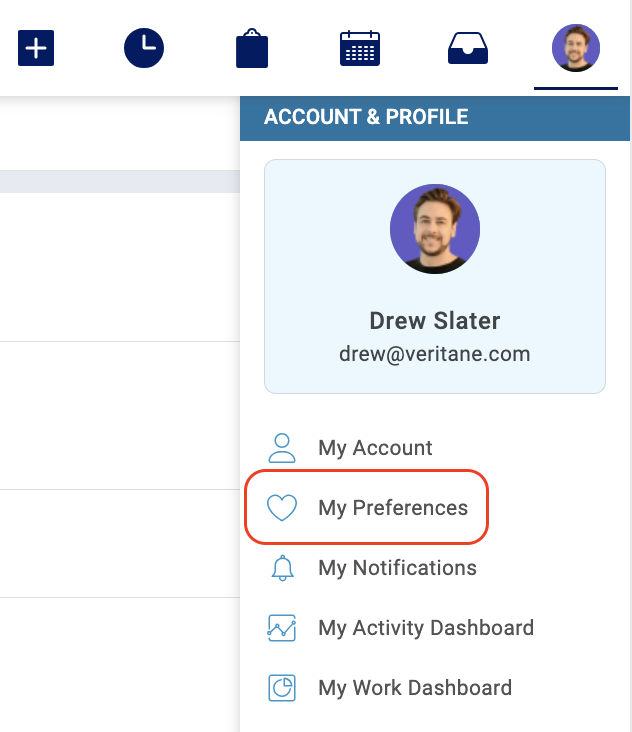 Under the Request Inbox Settings section, click the Expand button.
 -
 In the Included types field, type the name of the new Request Type.
 -
 Scroll to the bottom of the page and click Save.
