Configure your Activities module to control how time entries are recorded in your timesheet, group your activities into classes for better reporting, and add custom locations for quickly scheduling meetings.
Using this guide, you can:
- Set up your Activity Timesheet entries
- Configure the defaults for your timesheet entries
-
Determine how much detail the timesheet requires from your team
- Create tags
Setting up your Activity Timesheet Entries
Control how time entries are recorded in your timesheet in your Activities Settings.
To view your Activities Settings:
- Click the Settings button at the bottom of the left-hand side menu.

- Click on Activities & Emails on the left side of the page and select Settings.

Timesheet Defaults
Timesheet defaults determine the standard template which is applied to timesheet entries.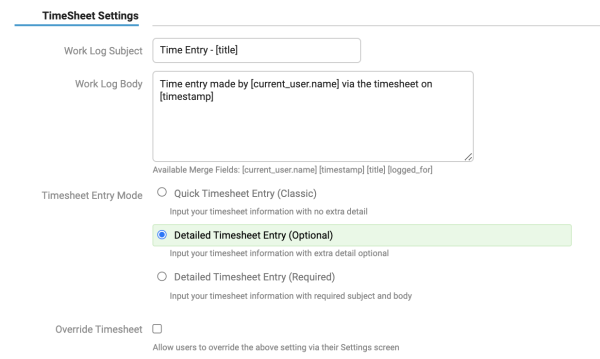
-
Work Log Subject - Timesheet entries made via the quick log method will use this template as its subject.
-
Work Log Body - Timesheet entries made via the quick log method will use this template as its body.
Timesheet Details:
Timesheet details determine how much detail is required when a user logs their time via the Timesheet.
Timesheet Entry Mode:
-
Quick Timesheet Entry (Classic) - Requires no extra detail when logging work via the timesheet. Timesheet defaults are used as the time entry’s subject and body.
-
Detailed Timesheet Entry (Optional) - Allows users to optionally add their own details when logging time via the timesheet.
-
Detailed Timesheet entry (Required) - Requires users to add their own details when logging time via the timesheet.
-
Override Timesheet - Allows users to choose their own timesheet entry mode, overriding the default entry mode.
If you bill for your time (as opposed to fixed-fee billing), then Accelo recommends requiring details when using the Timesheet.
Automatic Time Rounding
Time tracking can be a critical piece of your day-to-day operations in Accelo. And when reporting on that time being tracked, whether it be via the Utilization Dashboard or the Team Scheduling screen, you want to ensure that the time being logged is an accurate representation. Sometimes this means ensuring your time is accurate to the exact second.
For many companies, though, logged time needs to be rounded to a specific point, whether that be six minutes, 15 minutes, 30 minutes, etc. For these cases, we can utilize the automatic time rounding feature in Accelo to ensure that the time being logged on Activities will be rounded up or down to the nearest desired interval.
With time rounding enabled, your company’s time approval, billing and invoicing will be more streamlined and simple while also helping to prevent manual errors from occurring.
To begin setting up automatic time rounding:
- Click on the Settings button at the bottom left-hand corner of your deployment.

- Next, click on the Activities & Emails tab, then the Settings option.
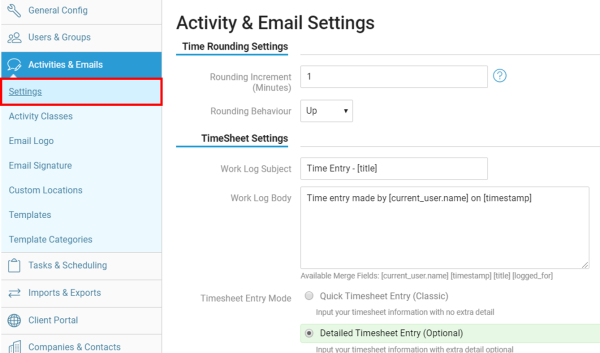
- On this screen, you’ll see a section for Time Rounding Settings.
Here is where you can set your Rounding Increment (in minutes) and your Rounding Behavior:
- Rounding Increment: The amount of time, in minutes, that your logged time will be rounding up or down, depending on what behavior is set.
Ex: If four minutes are logged and behavior is set to round up, then the logged time will round up to six minutes. If seven minutes are logged, then the time will be rounded up to 12 minutes.
NOTE: If a high increment is chosen, a warning will appear suggesting to choose a smaller number. - Rounding Behavior: Choose which way you wish your time to be rounded. There are three options:
-
Up: Logged time will be rounded up to the desired increment. (Ex: If increment is 10 minutes, but four minutes are logged, then the time will be rounded to 10).
-
Nearest: Logged time will be rounded to the nearest desired increment, whether that be up or down. (Ex: If increment is 10 minutes, but 13 minutes are logged, then the time will be rounded down to 10. If 16 minutes are logged, then the time will be rounded to 20.)
NOTE: If Nearest is chosen and the logged time falls directly between two increments (Ex: Increment is 10 minutes, but 15 minutes are logged.), then the time will be rounded up. -
Down: Logged time will be rounded down to the desired increment. (Ex: If increment is 10 minutes, but 19 minutes are logged, the time will be rounded back down to 10 minutes.)
-
NOTE: The minimum setting for the Rounding Increment is 1 minute.
Next, you can set Suggested time for 0 min Activities under the Timesheet Settings. That way, you can allow your users to quickly log a specified amount of time against emails or other quick Activities. 
NOTE: This feature can be disabled by setting the suggested time to 0 minutes.
Lastly, make sure to hit Save at the bottom of the page.
NOTE: Time Rounding settings do not apply to time logged on past Activities unless those Activities are edited on a timesheet.
Once automatic time rounding is set up:
When creating an Activity, you will now see a tooltip that displays what the timer will be rounded to the desired increment, depending on the behavior chosen.
In the example below, the timer displays 11 minutes currently logged. With a time increment of 10 minutes set plus a behavior of rounding up enabled, the tooltip will display a rounded time of 20 minutes.
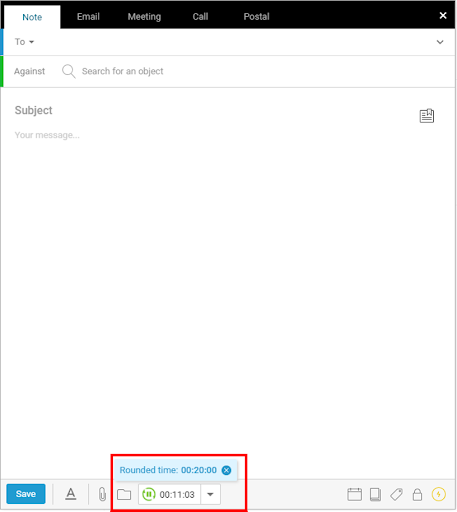
This tooltip will also appear wherever the Log Time modal is triggered in Accelo.
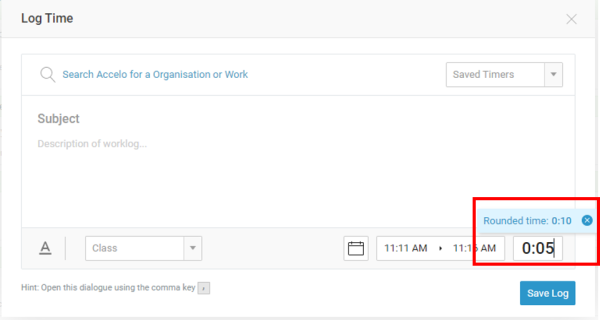
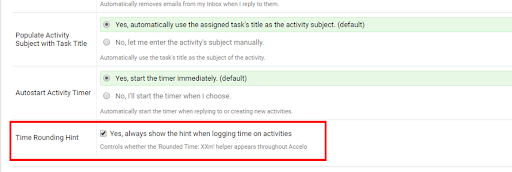
To disable this tooltip, hover over the tooltip on the Create Activity modal, then click the link on the Manager helper settings here option. This will direct you to the User Preferences screen.
Under the Privacy, Email & Activity Preferences section, uncheck the Time Rounding Hint option.
