
When you create a new user, choose Skills that users have that aid in completing work for your clients. You can also tag your Task with Skills required to complete the Task. When you are allocating your resources, you can sort Skilled users with Skills associated with the task to help you find the right person to work on it.
For example, if you tag a Task saying that it requires HTML skills, then you can cross-reference it with users who have HTML listed as a skill, and assign them the Task.


Add Tasks related to a specific item to keep track of what work you need to do on any given Project, Ticket, Retainer or Sale. Tasks are essential to delegating work that needs to be done, as well as to give yourself a "to do" list to ensure that all work is completed in a timely manner.
Using this guide, you can:
Add a Task on a Page
Add Tasks directly to a Sale, Ticket, Project, etc in order to automatically create that Task against the correct object. Create Tasks quickly in the Task section found on the Company page.
-
Find the page you wish to associate the task with. You can view a Sale, Ticket, Retainer Period, or Company,
-
Select Tasks on the available Tabs that may appear and click + Task. If it does not have a Task tab, it is because you are unable to add a Task on it. Some examples include Invoices, or Contacts. A special exception is Projects, as the Tasks are placed on the Project Plan or Overview instead.

-
The Against field will be automatically filled to reflect the page you are assigning the Task from.
-
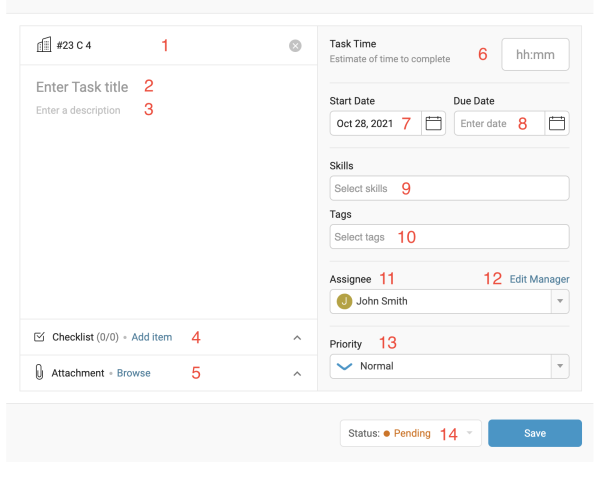
The Create Task Drawer will have a number of details you can populate.
-
Against - This field is what your Task is being placed against. Typically your Company or Work Objects. This is one of the required fields for a Task to be saved.
-
Title - This is the Title of your Task. Usually it is a brief summary of what the Work is. This is one of the required fields for a Task to be saved.
-
Description - These are the main details of the Task. If the work requires elaboration or otherwise, this is the best place to put it so the Assignee can read the important details every time they open up the Task.
-
Checklist - These are Checklists required for the Task. Your key to-do items to ensure the Task is completed properly.
-
Attachments - You can choose to upload any related files to the Task or view any existing files attached to the Task.
-
Budget - How much time do you think the Task will take? Anything added here will automatically fill out the Remaining Time to be the same amount when saved.
-
Start Date - The date you believe your Task should be started. Remaining Time will be automatically scheduled beginning on this date.
-
Due Date - The date you believed your Task should be finished by. Remaining Time will have all time left scheduled before or on this date.
-
Skills - These are Skills required for the Task. Helpful when matching up an appropriate Staff Assignee.
-
Tags - The Tags you wish to place on the Task. Useful for quick filtering when viewing through lists.
-
Assignee - The Assignee is the individual expected to work and finish the Task. They can be set to receive notifications on the Task. When users create Tasks in Accelo, they will have the ability to set a ‘Primary’ assignee as well as ‘Additional Assignees'. These assignees will be displayed across v4, wherever Accelo currently display Tasks. These assignees will be editable across the panels & screens they are displayed in, enabling a seamless modification experience.
The first iteration of Multi-Assignee will showcase Task Rates & Auto-scheduling according to the Primary assignee, while enabling all assignees to log time against task, simplifying budget tracking for managers. -
Manager - The Manager is the individual expected to be in charge of the Task. Often times they are the same as the Assignee. They can be set to receive notifications on the Task.
-
Priority - The Priority of your Task. Task Priorities give a quick visual queue for better work planning.
-
Status - This is the current state of the Task. The available options at the beginning are Pending (this Task is pending Acceptance by the Assignee), Accept (the Assignee has accepted the responsibility of this work), and Started (the Assignee has begun work). Later available statuses are setting it to be Inactive or Complete, but these are not available on creation - after all, why would you create an inactive Task or one that is already completed?
-
Create another task - Upon saving the current Task, you will be brought back to the same screen to create additional tasks.
-
Hit Save and your Task will be created. By default, it will show up on the Taskboard and Task list of the Assignee, and any Remaining Time on there will be automatically scheduled on their available work days.
-
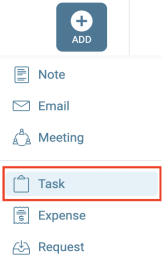
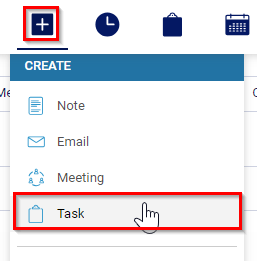
Add a Task from the + Create button
Create a Task from any page using the Navigation bar. This is the simplest way to Create a Task, as you will be able to create a task against any page, company, client, sale, project, etc, all in one location.
-
Hover over the + Create button on the Navigation bar and select Task.
-
Fill in all required fields. When creating a Task using the global create option, the modal will look different then the drawer options when adding tasks from specific objects. The fields are all the same, so follow the steps in the previous section if you have any questions to what each field represents.
