Search, filter, sort, and export your tickets to see detailed snapshots of collections of tickets within a time period. Using reports, you can monitor daily ticket activity, user performance, compliance with your service level agreements, average resolution times, and whatever custom fields fit your business.
Using this guide, you can:
Assign Tickets
Assign Tickets to users easily and efficiently through multiple methods to ensure that you find the right person to complete the job. Assign tickets from the Ticket View page, assign tickets in bulk from the Tickets Module, or Assign tickets to users using Team Scheduling if you have a Premium account.
Assign Tickets from the Ticket View page
Assign tickets from any Ticket page to make sure the right person is working on it, or Re-Assign the Ticket if you need to pass it off to another user.
To assign a Ticket:
- On the View Ticket page, navigate to the Ticket Details on the left side of the screen.
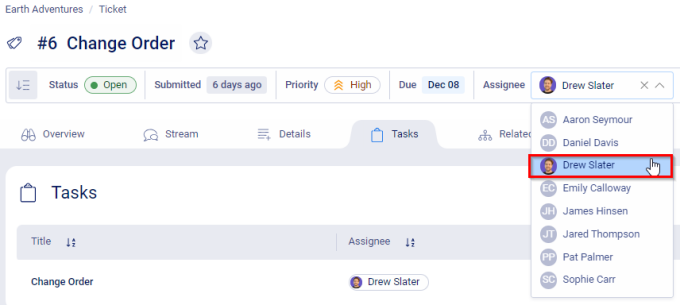
- Click into the Assignee section to select an individual to assign the ticket to. You can also Claim a ticket or a Surrender a ticket here.

- Assigning a ticket will send a notification to the Assignee, if you choose to do so. Edit the notification Subject and add any Additional Comments in the dialog box that appears. When finished, click the Send Notification button. If you wish to skip sending a notification, select the Skip - Don't Send Notification option.

Create Tasks to Tickets in Team Scheduling (PREMIUM)
Create work for Tickets quickly and efficiently to the right user using Team Scheduling.
To view unassigned tickets in Team Scheduling:
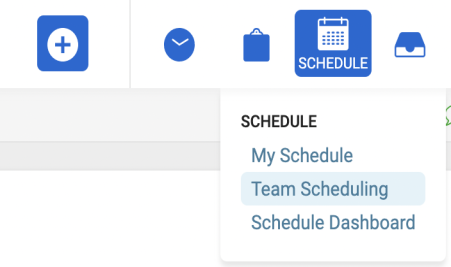
- Hover over the Schedule button on the Navigation bar and select Team Scheduling.

- Select the Tickets tab.

- Click the Edit button to view Filters.

- Click on the Assignee Filter and select Unassigned to show only Unassigned Tickets.

Assign Tickets to users by Allocating Work in Team Scheduling.
Surrender Tickets from the Ticket View page
Surrender tickets from any Ticket page to release the assignee from a Ticket and ensure the right person is notified and prompted to reassign it.
To surrender a Ticket:
-
On the View Ticket page, navigate to the Ticket Details on the left side of the screen.
-
Under the Assignee's name, you will see the option to Surrender the ticket. Click Surrender to do so.

-
The ticket will now be Unassigned.
Search, filter, sort, and export your tickets to see detailed snapshots of collections of tickets within a time period. Using reports, you can monitor daily ticket activity, user performance, compliance with your service level agreements, average resolution times, and whatever custom fields fit your business.
Using this guide, you can:
Assign Tickets
Assign Tickets to users easily and efficiently through multiple methods to ensure that you find the right person to complete the job. Assign tickets from the Ticket View page, assign tickets in bulk from the Tickets Module, or Assign tickets to users using Team Scheduling if you have a Premium account.
Assign Tickets from the Ticket View page
Assign tickets from any Ticket page to make sure the right person is working on it, or Re-Assign the Ticket if you need to pass it off to another user.
-
On the View Ticket page, click Add next to the Assignee section.

-
A drop-down of deployment users will appear. Select the desired Assignee.

-
You can re-assign the Ticket at any time following the same process and selecting a different Assignee.
Create Tasks to Tickets in Team Scheduling
Create work for Tickets quickly and efficiently to the right user using Team Scheduling.
To view unassigned tickets in Team Scheduling:
-
Hover over the Schedule button on the Navigation bar and select Team Scheduling.

-
Select the Tickets tab.

-
Click the Edit button to view Filters.

-
Click on the Assignee Filter and select Unassigned to show only Unassigned Tickets.

Assign Tickets to users by Allocating Work in Team Scheduling.


