Easily edit Ticket details to add relevant information and to help keep details of your work accurate in order to ensure accurate billing and work tracking. Delete a Ticket if it is a mistake or is no longer relevant, or close and merge tickets to keep the work and information visible.
Using this guide, you can:
Edit your Ticket Details
Edit to a Ticket to ensure all details are accurate to ensure that the work is billed and logged correctly.
To edit a ticket:
- Click on the Edit button on the top right side of the Ticket View page.

- Options to Edit the Ticket include:
* Contact - Change the primary Contact for the Ticket.
* Class - Change the class of the Ticket.
* Retainer - This field may be visible if you are using the Retainers module and you have an active contract for this client. This means any billable time on this Ticket will now be allocated to that Retainer Period.
* Subject - Update the subject (or title) of the Ticket.
* Description - Update the description.
* Priority - Change the priority. This is a label for filtering purposes.
* Start and Deadline - Adjust the Start and Due dates as needed.
* Custom fields - You may have other fields available on this form which are custom to your system, depending on what you configured.
- Click Save to update any changes, or Cancel to return without saving.
Delete a Ticket
Everyone can delete their own Tickets as long as they are not Locked. Locked Tickets have been approved/reconciled for invoicing and cannot be changed. You need the Ticket Delete Permission to delete others’ Tickets.
To delete a ticket:
- Find the Ticket you want to delete.
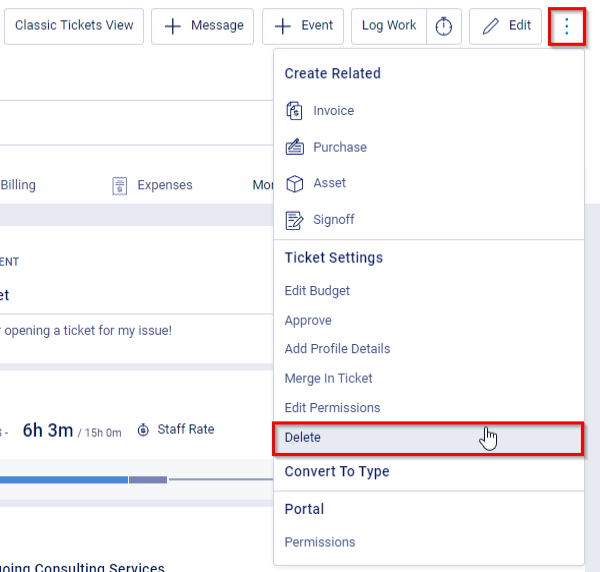
- Click the 3 Dot Button from the menu at the top right side of the Ticket View page. In the dropdown menu, select Delete.

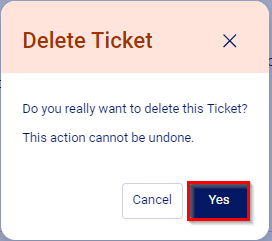
- A window will pop up asking you if you are sure you want to delete the ticket. Select Yes to confirm the delete.

Alternative Options to Deleting (Close & Merge)
If you want to still be able to access the work completed on the Ticket, but want to remove the Ticket from your reporting, you may want to change the Ticket to a Closed Status or Merge it with another Ticket.
Close the Ticket
You can Close the Ticket from the Status bar drop-down options at the top of the Ticket View page. 
You may need to set up a progression that moves the Ticket from an open/active status to a closed status. Learn how to set up Progressions.
Note: Closed Tickets are automatically hidden from search results.
Merge the Ticket
This is ideal for handling duplicate or similar Tickets from the same client.
Note: Merged Tickets cannot be separated. The activities from the merged Tickets will be retained, but everything else will be deleted.
To merge tickets:
- View the Ticket you want to keep.
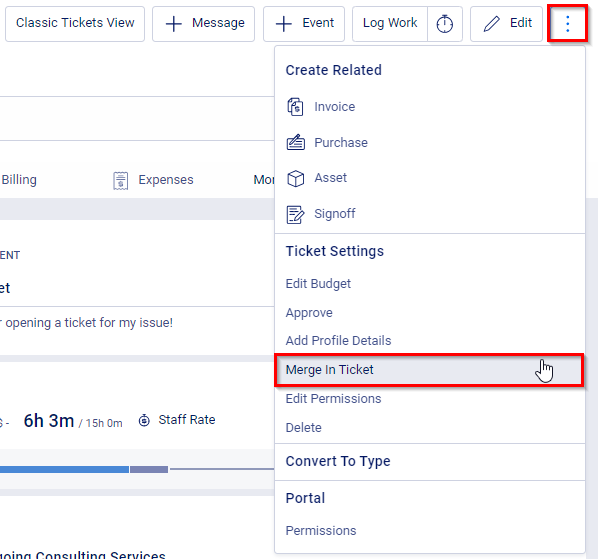
- Click the 3 Dot Button from the menu at the top right side of the Ticket View page. In the dropdown menu, select Merge in Ticket.

- A list will appear of all Tickets associated with the same Company. Check the box next to each of the Tickets you want to merge with this Ticket.

- Click the Merge Tickets button.


