Any time you need to do work for a client that is outside of your normal scope of work or what you originally agreed upon, you may want to create a Signoff to have your client or coworkers approve this work. Clients can track these types of extension requests directly within their Client Portals, so they can make comments, add attachments and approve work.
Learn more about Creating Signoffs.
Keep a budget tracked on your Tickets for a real-time cost comparison of the time and money tallied as staff do their work, seeing how much time and money you are spending on individual clients, and allowing you to have higher-level discussions on where you can best allocate your resources.
Using this guide, you can:
Ticket Budget
Having a budget on a Ticket is optional. They are useful for quoting ad-hoc services, or small quoted sets of work. A user may be able to set the budget and rate when creating the Ticket, but you can always add/edit the budget afterward as well.
To edit the budget:
- Select Edit Budget on the left side of the Ticket View page.

- A window will pop up, where you can set the Ticket Budget and all the details you can configure.

- Configure the type of budget you want for our Ticket. You have three main options and the amount of time you wish to allocate for the budget.

- Search for and select the Service Type if necessary, from your saved Service Items. This will allow you to keep track of the Services you are providing, for your personal records. This will not affect the Budget price but will apply the default ledger & tax codes on the Services to the work you are logging. Also, define your hourly rate (this option will not appear if you chose to have a Non-Billable budget).

- Use staff rate: Apply the rates of the individual users/staff working on this Ticket. Set up rates.
- Defined rate: Choose a set rate from the drop-down list, which you can also choose to override if necessary.
- Add any Materials to the Ticket Budget. These can be inputted from your saved list of Materials, or can be entered as needed for each Ticket.

Click "Add New Materials" to add a new Material. You can list as many Materials as required. Click the Save button when you have entered the details of the Material to save it.

Once you save the budget, you will see more information under the Budget & Work section on the left-hand side of your Ticket:
-
Ticket Budget: May include hours, monetary value, or both, depending on the budget type you selected. The Circle will slowly fill in as work is logged. It will remain Green when it is on target, but once it is over budget, a red circle will slowly fill.
-
Billing Rate - The current rate applied. If you have changed rates, the budget will adapt moving forward. This will not change the rate retroactively for previous work done.
-
Current Tasks - The number of Tasks that have been completed out of the total number of Tasks created against the Ticket. The circle will slowly fill in as the number of completed tasks approach the number of Tasks under the Ticket.
Keep a budget tracked on your Tickets for a real-time cost comparison of the time and money tallied as staff do their work, seeing how much time and money you are spending on individual clients, and allowing you to have higher-level discussions on where you can best allocate your resources.
Using this guide, you can:
Ticket Budget
Having a budget on a Ticket is optional. They are useful for quoting ad-hoc services, or small quoted sets of work. A user may be able to set the budget and rate when creating the Ticket, but you can always add/edit the budget afterward as well.
View the Budget: You can view the Budget from the default Overview tab. The Budget section contains the Current Value/Budgeted Value, Current Time/Budgeted Time, Rate, Number of Tasks and Remaining Task Time, and a Progress Bar with current Value percentage.

Edit the budget:
-
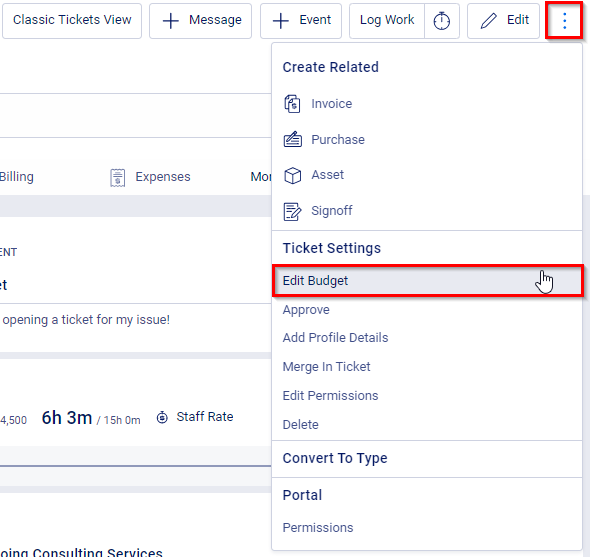
Click the 3 Dot Button from the menu at the top right side of the Ticket View page. In the dropdown menu, select Edit Budget.

-
A window will pop up, where you can set the Ticket Budget and all the details you can configure.

-
Configure the type of budget you want for our Ticket. You have three main options and the amount of time you wish to allocate for the budget.

-
Search for and select the Service Type if necessary, from your saved Service Items. This will allow you to keep track of the Services you are providing, for your personal records. This will not affect the Budget price but will apply the default ledger & tax codes on the Services to the work you are logging. Also, define your hourly rate (this option will not appear if you chose to have a Non-Billable budget).

- Use staff rate: Apply the rates of the individual users/staff working on this Ticket. Set up rates.
- Defined rate: Choose a set rate from the drop-down list, which you can also choose to override if necessary.
- Add any Materials to the Ticket Budget. These can be inputted from your saved list of Materials, or can be entered as needed for each Ticket.

Click Add New Materials" to add a new Material. You can list as many Materials as required. Click the Save icon when you have entered the details of the Material to save it.


