Use Timers on the go with either our Web or Mobile Application.
Web Application: Using timers in the Web Application is easy and convenient. Learn more here.
Mobile App & Apple Watch Timers: Use your phone to create, start and pause timers in the Mobile App, and watch them sync with the Web App like magic. Download here.
Manage your tickets, log time against a ticket, and update the ticket's status, all from the Ticket View page. Ensure that all work is completed correctly and time is logged against the ticket so that billing is accurate.
Using this guide, you can:
Manage a Ticket
Manage the details of your Tickets to ensure that all the information is accurate and work is being completed correctly.
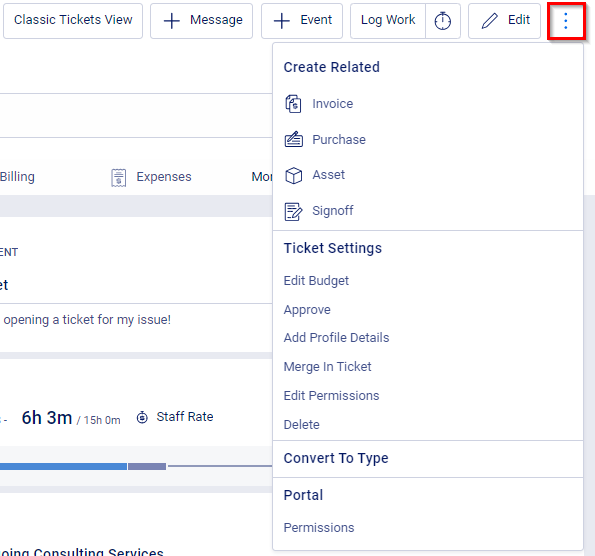
Managing internal Ticket details can be done by clicking on the 3 Dot button.
The options available in the drop-down list are:
- Create Invoice: Create an invoice for your client.
- Create Purchase: Create a purchase for Materials or Expenses added to the Ticket.
- Create Asset: Create an Asset associated with the Ticket.
- Create Signoff: Create a Signoff to send your client, for Ticket related work approvals.
- Edit Budget: Edit or Add a budget to your Ticket.
- Approve: Quickly approve the Ticket.
- Add Profile details: Create a profile entry for the ticket.
- Merge in Ticket: Merge multiple Tickets into the current Ticket you are viewing.
- Edit Permissions: Edit user permissions specific to this Ticket.
- Convert to Type: Change the Status and Progressions of your current Ticket into another Type.
- Delete: Remove the Ticket from your Accelo database. This cannot be undone.
Logging Time
Log your time as you work on a Ticket in order to ensure that billing is accurate. At any time, Add a Message, Event, Log Work, or start a Timer against the Ticket with the click of a button. All work and time logged against a Ticket will be defaulted to Billable unless noted otherwise.
Click + Message, + Event, or Log Work from the top right to start a new activity. Learn more about Adding an Activity.

To log time against a specific Task:
Select the Tasks tab, click on the three dots next to the Task you want to add time to then choose from Create Message, Log Work, or Start Timer depending on your needs.
You can mark a message/Work Log as either billable or non-billable, buy toggling the below icon next to the time input.
- Billable:

- Non-Billable:

Note: If you have started the timer you will be able to make this time Non-billable after Completing it.
Update Ticket Status & Progressions
Your Status & Progressions for the Ticket are located at the top of the Ticket Overview. These operations are dependent on the progression that is configured for each Ticket type you use.
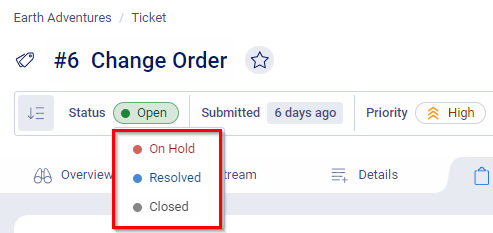
To change the Status of a Ticket, click on the current Status and choose the new Status from the drop-down options.

Some Status changes may require you to provide more information or prompt you to complete certain actions. You may also be prompted to approve the activities against the Ticket, ensuring that any time spent on the Ticket has been reviewed and then appropriately allocated to an invoice.
Close your Ticket to let your team and clients know that you’ve completed your work. To close a Ticket, simply click on the Closed Status at the top of the page.
Your deployment has been set up with basic automation when you close a ticket, including collecting client-facing Resolution Notes and notifying the client that the work has been completed.
Learn how to configure your Status & Progressions.


