Keep your accounting and production teams on the same page by automatically syncing invoices and payments between your Accelo and Xero accounts.
Using this guide, you can:
- Connect Xero to Accelo
- Import invoices from Xero
- Choose your Xero Integration Preferences
- Edit an Invoice
- Record a Payment
- Understand what information syncs between Accelo and Xero
What does the Xero integration actually do?
-
Imports current and historical customers from Xero into Accelo
- Imports current and historical invoices from Xero into Accelo
-
Imports your accounting configuration for more accurate invoicing in Accelo, including:
-
Inventory items
-
Product, material and service items
-
Ledger codes
-
Tax codes
-
Tracking categories
-
-
Syncs all of your invoices between Accelo and Xero, including:
-
Newly-created invoices
-
Updates to existing invoices (including custom Invoice #s)
-
The invoices' contact information
-
The invoices' payments
-
-
Syncs all of your bills between Accelo and Xero, including:
-
Newly-created bills
-
Updates to existing bills
-
The bills' vendor information
-
The bills' payments
-
How does Accelo’s two-way synchronization work?
When an invoice is created in either Accelo or Xero, Accelo will automatically check for the same contact in the opposite system. If a matching contact is found, then we'll create the new invoice under that contact. If no matching contact is found, we'll automatically create a new contact for you. With that invoice we'll also sync several key data points, which include:
-
The contact's First and Last Name
-
The contact's Company/Client name
-
The contact's physical address, email address and phone number
-
The Invoice Title and Description
-
Individual line item Descriptions, Subtotal, and Tax Amounts
-
The Tax and Ledger Codes used for each line item
-
The Service or Material Item used for each line item
-
The Tracking Category used for each line item
-
Payment Amounts, Methods, Dates and Recording Staff Person
-
The Invoice Number from Xero
Connecting Xero to Accelo
Important things to note before integrating your accounts:
-
Connecting your Xero account will begin automatically syncing new invoices between the two systems.
-
Connecting your Xero account will not import any existing invoices to Accelo automatically. You will have the option to Import previous invoices.
-
Only an Accelo Administrator is able to connect to Xero.
-
Only a Xero Administrator is able to authorize the integration within Xero.
To connect your Accelo account to Xero:
-
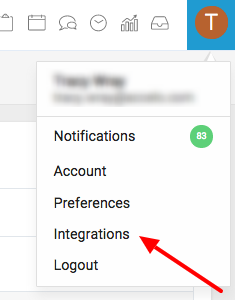
Open the Integration page by clicking your User Profile Icon in the Navigation Bar and selecting Integrations.

-
Select Xero from the left, and then click the Connect button.

-
If you're not already logged in to your Xero account, a window will pop up with a prompt to log in.
-
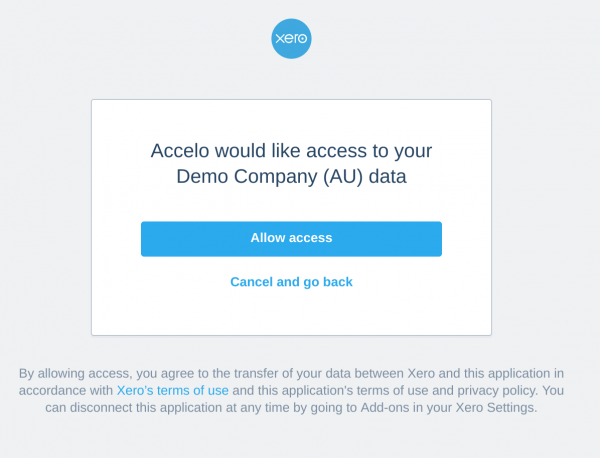
Select the Xero Organization that you'd like to integrate with and click the Allow Access button.

Note: If your preferred organization is greyed-out (not selectable), this means Accelo is already connected - perhaps from a trial or sandbox Accelo account set-up previously.
Congratulations! You've successfully connected your Accelo and Xero accounts. If you need to disconnect, you can do this from within Accelo or from Xero's "Connected Apps" area in the Xero Settings page.
Importing your data from Xero
Now that you've connected your Xero and Accelo accounts, your accounting codes, customer, invoice and payment history can be imported from Xero!
Your import options include:
-
Import Account and Tax Codes from Xero:
Pull your existing ledger and tax codes from Xero into Accelo. This is a vital step to ensure your invoices sync accurately. Staff can then select from these ledger and tax codes when creating invoices in Accelo, which will ensure that your invoices are listed properly in Xero.-
Accelo requires at least one Tax Code be synced with Xero in order to sync invoices. If you don't charge tax, a tax code set to 0% can be used instead.
-
-
Import Products and Services from Xero:
-
Pull your existing inventory, product and service items from Xero into Accelo as Materials and Services. Similar to the account and tax code import, this is a vital step to ensuring that your invoices sync accurately. Your staff can select from these items when creating invoices in Accelo, ensuring that the correct inventory item is attributed to each line item, updating your inventory on hand, and creating more detailed invoicing reports.

-
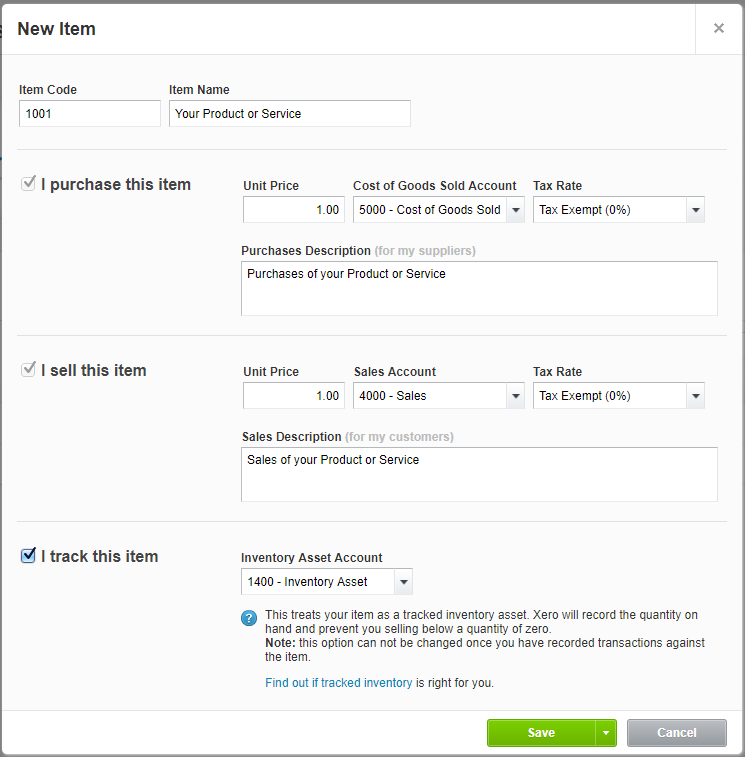
Items in Xero which are only marked as I sell this item will be imported as Services in Accelo.
-
Items in Xero which are marked as both I sell this item and I purchase this item will be imported as Materials in Accelo.
-
The I track this item setting does not affect the import.
-
-
-
Import Tracking Categories from Xero:
Pulls your active Tracking Categories and their options from Xero into Accelo. These Tracking Categories can be applied to your invoices' line items when creating invoices in Accelo, giving you more detailed reports when the invoices sync with Xero. -
Import Companies from Xero:
Pull your existing company and supplier records from Xero into Accelo, creating new Company & Contact records for them.
The Company import includes the following details:-
-
The contact's First and Last Name
-
The contact's Company/Client name
-
The contact's Physical Address, Email Address and Phone number
-
-
-
Import Invoices and Payments from Xero:
Pull your existing invoices and their payments from Xero into Accelo, creating new invoice and payment records for.The Invoices and Payments import includes the following details:
-
The Invoice Title and Description
-
Individual line item Descriptions, Quantity, Rate, Subtotal, and Tax Amounts
-
The Tax and Ledger Codes applied to each line item
-
The Inventory Item applied to each line item
-
The Tracking Category applied to each line item
-
Payment Amounts, Methods, Dates and recording Staff Member
-
The invoice's customer-facing Notes
-
The invoice's Internal Notes
-
Choosing your Xero Integration Preferences
Now that you've connected your Accelo and Xero accounts, new invoices will begin to automatically sync between the two systems. You'll also have several options available to control what information is included in that sync:
-
Sync invoices created in Xero: Determines whether Accelo will automatically pull new invoices into Accelo which are created in Xero. This setting does not affect Accelo's push of new and updated invoices to Xero.
-
Sync bills created in Xero: Turning this option on will sync all bills created in Xero with your Accelo deployment. Purchases in Accelo will always be synced, regardless if this option is enabled or not.
-
Default invoice, payment and purchase status: Determines the status which will be applied to invoices which are pushed from Accelo to Xero.
Status Options:
1. AUTHORIZED: The invoice will be marked as Approved/Authorized in Xero. Users can only edit invoices within Accelo.
2. DRAFT: Users can continue to edit invoices in Xero & Accelo, until that invoice has been Approved in Xero.
-
Push Payments Created in Accelo: Determines whether payments can be entered in Accelo and automatically synced with Xero, or can only be entered in Xero. When enabled, you'll also be prompted to select a default payment account:

-
Default Payment Account: Determines the income account which will be used when payments are pushed from Accelo into Xero.
-
-
Import Xero Contacts when Importing Xero Invoices: Automatically creates a new Company and Contact in Accelo if a new invoice is created in Xero, but the invoice's contact has not been imported into Accelo. Invoices created in Xero with new contacts while this setting is disabled will not be imported. This setting requires Sync Invoices Created in Xero to be enabled.
-
Status to Import Companies With: Status which will be used in Accelo when importing new companies from Xero
-
Status to Import Suppliers With: Status which will be used in Accelo when importing new suppliers from Xero
Editing Your Invoices
Edit your invoices in Accelo using the Edit Invoice button.
This button appears when viewing an invoice that has not yet been paid or approved in Xero
NOTE: Once your invoice has been Paid or Approved in Xero, you will no longer be able to push changes from Accelo to Xero, as Xero locks the invoice to prevent further changes.
Using the Edit Invoice page you're able to edit the full range of invoice details, including:
-
Invoice Contact
-
Invoice Title
-
Invoice Description
-
Raised & Due Dates
-
Line Item Descriptions
-
Line Item Prices
-
Line Item Tax and Ledger Codes
- Line Item Service and Material Items
- Line Item Tracking Categories
NOTE: When editing an Invoice in either Accelo or Xero, it is highly-advised to not have the same Invoice opened in the other system (Accelo or Xero), as this may cause line items to be duplicated.
Recording Payments
Payments can be recorded in either Accelo or Xero, and will sync between the two systems automatically.
To record a payment in Accelo, follow these simple steps:
-
Open the invoice in Accelo
-
Click the Payment button, and select Record Payment

-
Enter the payment amount, method and date, and save.

NOTE: Overpayments and Prepayments are not supported, and will not sync with Accelo.
Understand what information syncs between Accelo and Xero
Tax Codes
|
Accelo Field |
Xero Field |
|
Title |
Display Name |
|
Rate (%) |
Total Tax Rate |
Account Ledger Codes
|
Accelo Field |
Xero Field |
|
Title |
Name |
|
Code |
Code |
|
Can Purchase? |
Show in Expense Claims? |
|
Can Receipt? |
Enable Payments to this Account? |
Product/Material and Service Items
|
Accelo Field |
Xero Field |
|
Item Name |
Item Name |
|
Item Code |
Item Code |
|
Item Type |
I purchase this item |
|
Description |
Sales Description & Purchase Description |
|
Sale Account |
Sales Account |
|
Sale Tax Code |
Sales Tax Rate |
|
Purchase Account |
Purchases Account |
|
Purchase Tax Code |
Purchases Tax Rate |
|
Sale Price (excl. Tax) |
Sales Unit Price |
|
Purchase Price (excl. Tax) |
Purchases Unit Price |
Tracking Categories
|
Accelo Field |
Xero Field |
|
Tracking Category |
Tracking Category Name |
|
Category Option |
Category Option |
Invoices
|
Accelo Field |
Xero Field |
|
Invoice Title |
Reference |
|
Raised |
Date |
|
Due |
Due Date |
|
Invoice Number |
Invoice # (including custom Invoice #s) |
|
Line Item Item |
Line Item Item Code |
|
Line Item Description |
Line Item Description |
|
Line Item Quantity/Rate |
Line Item Quantity |
|
Line Item Rate/Sale Price |
Line Item Unit Price |
|
Tracking Category 1 |
Tracking Category 1 |
|
Tracking Category 2 |
Tracking Category 2 |
|
Line Item Tax Code |
Line Item Tax Rate |
Purchases/Bills
|
Accelo Field |
Xero Field |
|
Title |
Reference |
|
Purchase Date |
Date |
|
Payment Due |
Due Date |
|
Line Item Item |
Line Item Item Code |
|
Line Item Description |
Line Item Description |
|
Line Item Quantity/Rate |
Line Item Quantity |
|
Line Item Rate/Sale Price |
Line Item Unit Price |
|
Line Item Ledger Code |
Line Item Account |
|
Tracking Category 1 |
Tracking Category 1 |
|
Tracking Category 2 |
Tracking Category 2 |
Payments (Recorded in Xero)
|
Accelo Field |
Xero Field |
|
Reference |
Reference |
|
Received On |
Payment Date |
|
Payment Method Account |
Paid To |
|
Amount |
Amount Paid |
Payments (Recorded in Accelo)
|
Accelo Field |
Xero Field |
|
Reference |
Reference |
|
Payment Created Date |
Payment Date |
|
Payment Method Account |
Paid To |
|
Amount |
Amount Paid |
|
Received On |
n/a |
Credit Notes
|
Accelo Field |
Xero Field |
|
Reference |
Credit Note # |
|
Received On |
Date |
|
Amount |
Amount |
Customers & Vendors
|
Accelo Field |
Xero Field |
|
Company Name |
Contact Name |
|
Contact First Name |
Primary Person First Name |
|
Contact Last Name |
Primary Person Last Name |
|
Contact Email Address |
|
|
Contact Phone |
Phone |
|
Contact Mobile |
Mobile |
|
Company Primary Address Street1 & Street2 |
Postal & Street Address |
|
Company Primary Address City |
Postal & Street City/Town |
|
Company Primary Address State |
Postal & Street State/Region |
|
Company Primary Address Zipcode |
Postal & Street Postal / Zip Code |
|
Company Primary Address Country |
Postal & Street Country |
