Custom Fields make it easy for you and your team to capture key bits of information about the work you do, and you can configure progression actions so that users are prompted to enter or update extensions as part of a business process.
Custom fields can be defined for a specific type of sale, project, ticket or contract. They can be all sorts of field types - from drop-down lists through to text boxes, date fields, and even links back to specific companies or staff.
For more additional information on Custom Fields, please follow this link.
Custom Fields
Custom Fields allow you to define more fields, on a type by type basis, for clients, sales, projects, tickets, retainers and more in Accelo.
For example, we can assume that every Project has a Title, Manager, Status and a few date fields - like commenced and due. These are fields that we include on every job. Beyond that, it's up to you to define the fields you need to keep track of your work.
Custom fields can be configured for the following modules:
- Sales
- Tickets
- Projects
- Retainers
- Contributors
- Assets
Add a Custom Field to a Module Type
When creating Custom Fields you must select a Type because these fields are designed to be unique to a type of work. Custom Fields are created solely attached to one Module Type.
However, if you find you need an custom field to be applied to more than one type, you can always create a custom field with the same name and values for each type. You must replicate the Add Custom Field process for each module type.
Note - you must be an admin user to access this feature.
To add a custom field:
-
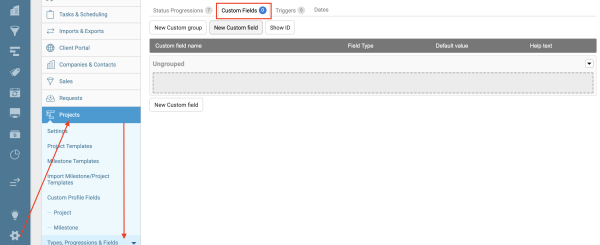
Navigate to the Settings page.
-
Choose whichever Module → Types, Progressions & Fields (for Assets, choose Types & Custom Fields)
-
Select the Type you wish to configure from the list of types and progressions.
-
In this example, I want to set up some custom fields for my Project job type, so I will select the Project → Configuration screen, and specifically the Project type.
-
Whilst viewing the Project job type, I can select the Custom Fields tab.
-
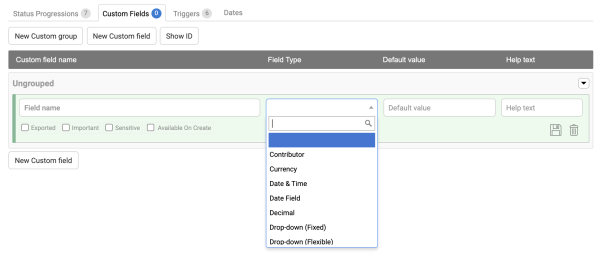
To add a new field, click New Custom Field button. Note - your new field will appear at the very bottom of the list.

-
Fill in Custom Field details:
Field Name (required) - the name off your new field.
Field Type - Depending on the type of field you have chosen, you can enter the Options (or values) to choose from. Read more about custom field types below.
Default Value - Define the defaulted value this custom field will have, if you desire
Help Text - Add in more information about that specific custom field that will help your users to fill out this field. This is helpful if you have new staff members or contractors, or if it's a complicated procedure this is where you write up more information. What you write here will appear in grey text under each field.
-
Click the Save (disk) icon to add your new field, or the recycle bin to delete it.
Custom Field Types
When adding a custom field, the Field Type allows you to define what kind of information the field should hold, such as text, numbers, currency, dates, a picklist, and even a contact or staff member.
-
Text and Textbox - Enter some text. Use the Textbox option to put a limit on the amount of text displayed (but not entered). When the limit is reached, a "Show More" button is visible. If you're anticipating a lot of text, use the TextBox type.
-
Hyperlink - A text field which when saved will convert to a URL for easy linking to a website. Note - Users do not need to enter “http://”
-
Number - Useful for tracking whole numbers.
-
Decimal - Allows the user to enter a number to 2 decimal places.
-
Currency - Useful for recording a fee, cost or other currency related figure. Uses the system default currency.
-
Date Field and Date & Time - Provides a date selector for the user to specify a date. Date & Time will also populate the current time, which can be edited.
-
Drop-Down (Fixed) - Configure a drop-down box with a fixed set of options which the user can select.
-
Drop-Down (Flexible) - Configure a drop-down box with a fixed set of options, and also allow the user to manually enter an option.
-
Drop-Down (Multiple) - Configure a drop-down box which allows the user to select multiple answers.
-
Object Lookup - Allows the user to link a Contact, Client, or Staff Member.
-
Contributor - Similar to lookup, but you can only select from a list of active contributors for that record.
-
Formula (date) - Create a formula related to dates; add operations based upon a set field, number, or date
-
Formula (number) - Create a formula related to numbers; add operations to calculate based upon a set field, number or date.
Each field also has some special configuration settings:
-
Important - Allows this field to be visible in the filter list when refining a list of results. Additionally, if the field is a "select" field (such as a fixed-select or multi-select) then it will also appear in the main navigation as a search option.
-
Exported - This field setting means this field will be included in a spreadsheet export.
-
Sensitive - This field setting ensures that only people with specific access granted will be able to view this field, making it easier and safer to store access details, pricing details or other more sensitive information that you don't want to share as widely with your teammates.
- Available on Create - Allows this field to be available upon creation of a new Project of this type.
Re-ordering
The order your Custom Fields appear on the Edit and View screens for the module will relate to how they appear on the Configuration page.
To change the order of the fields in this list you may drag and drop the Custom Field box on the left of each field. If the list is very long, try using the Page Up and Down keys at the same time.
Group your Custom Fields
Easily arrange your Custom Fields into Groups by creating Custom Groups. By dividing custom fields into custom groups, you will change the way these custom fields appear on your configuration screen, and therefore how they appear on the Edit and View screens for the module.
To add a Custom Group
-
Click the New Custom group button.

-
Name the group, and drag and drop Ungrouped fields into the New Group.
-
Re-order the way your custom fields appear in the new group by dragging and dropping.
-
Click Save. These custom fields will now appear grouped together on the next page.
