
Stay organised and productive on the go with the Attachments tab in the mobile app. Easily view, search, upload, and manage files across your work, with attachments displayed in a clear folder structure and enriched with key details for quick reference. Navigate, search, and interact with important documents wherever you are, with a seamless experience aligned across mobile and web.
Attachment visibility and actions are permission-controlled. User permissions are inherited from the web app and consistently observed across mobile, ensuring you only see and interact with attachments you have access to.
In this guide, you can:
- View attachments (including which objects support attachments)
- Add attachments
- Create folder
- Delete attachment
- Delete folder
- Download attachment
- Rename attachment
- Rename folder
View Attachments (including which objects support attachments)
-
Navigate to a work object by tapping More > Companies.
In this example, we will use a Company.
(Please note: Attachments are available on Companies, Contacts, Sales, Projects, Tickets and Retainers)
-
Search for or tap a company from the list.
-
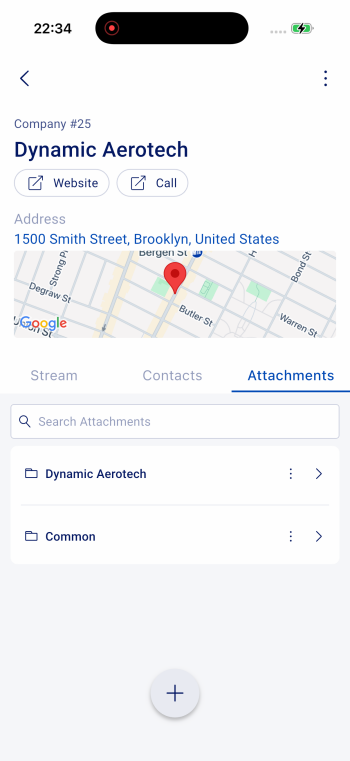
Swipe across the page headers until you reach the Attachments tab.
-
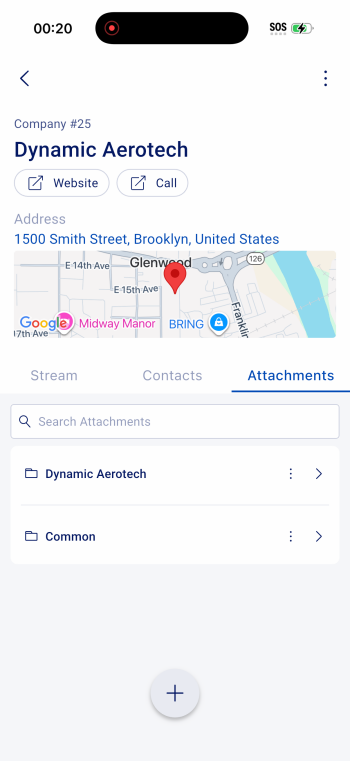
Under the Attachments header, you will see the attachment structure for the company, including:
-
The folder for the selected work object
-
The Common folder
-
-
From this view, you can:
-
Use the search bar to search for attachments by name.
-
Tap a folder to drill into it
-
Tap the kebab menu (⋮) next to a folder to add an attachment, rename the folder, or delete the folder
-
-
Tap the work object folder and continue drilling down until you see a list of files.
-
Tap a file to open the attachment.
-
From the file view, you can:
-
Download the attachment
-
Tap the back arrow to return to the previous folder
-
Add attachments
-
Navigate to the Attachments tab or drill into a folder, as described in the previous section.
-
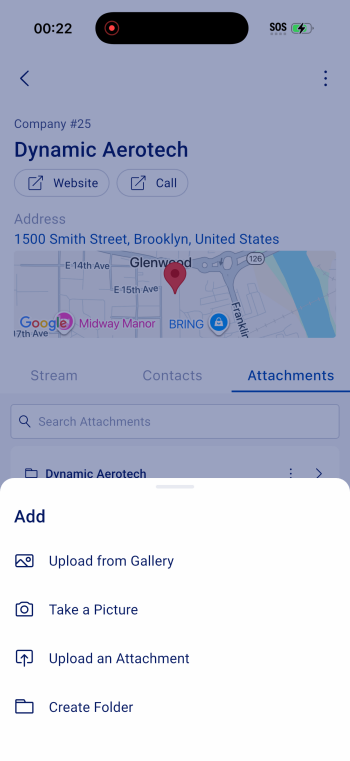
From either screen, a + icon will be displayed at the bottom of the screen.
-
Tap the + icon to open the attachment actions menu, which includes the following options:
-
Upload from gallery
-
Take a picture
-
Upload an attachment
-
Create a folder
-
-
Select one of the options to add or create content within the current attachment location.
- The options and steps for each are as follows:
Upload from gallery
-
Tap Upload from gallery from the attachment actions menu.
-
Select an existing image or file from your device’s gallery.
-
Once selected, the file will upload automatically.
-
A success or error message will be displayed to confirm the outcome.
Take a picture
-
Tap Take a picture from the attachment actions menu.
-
If prompted, allow the app access to your device’s camera.
-
Capture a photo using your device’s camera.
-
Once confirmed, the photo will upload automatically.
-
A success or error message will be displayed to confirm the outcome.
Upload an attachment
-
Tap Upload an attachment from the attachment actions menu.
-
Select a file from your device, such as a document or PDF.
-
The file will upload to the selected folder or work object.
-
A success or error message will be displayed to confirm the outcome.
Create a folder
-
Tap Create a folder from the attachment actions menu.
-
Enter a name for the folder.
-
Tap Save to create the folder.
-
A success or error message will be displayed to confirm the outcome.
-
Create folder
-
Navigate to the Attachments tab or drill into a folder, as described in the previous section.
-
From either screen, a + icon will be displayed at the bottom of the screen.
-
Tap the + icon to open the attachment actions menu, then tap Create folder.
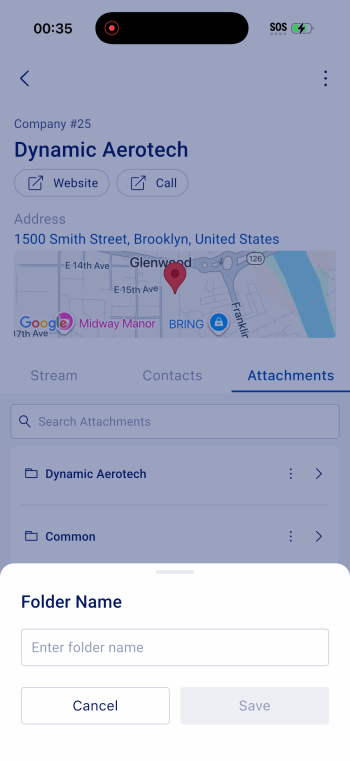
-
Enter a name for the folder.
-
Tap Save to create the folder.
-
The folder will be created at the level where the action was performed.
For example, if you have drilled into a subfolder, the new folder will be created within that subfolder.
-
A success or error message will be displayed to confirm the outcome.
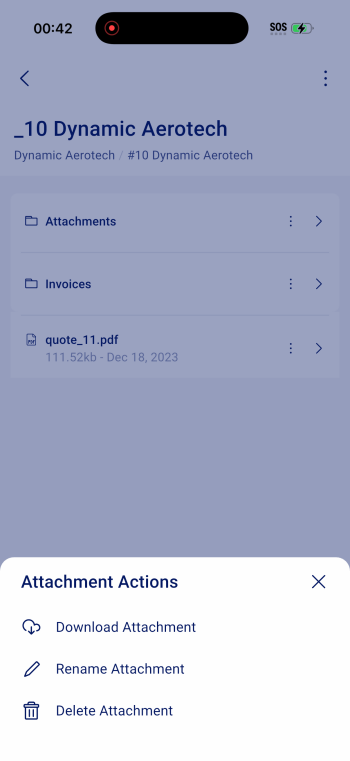
Delete attachment
-
Navigate to the Attachments tab, as described in the previous sections.
-
Drill down into the folder containing the file you want to delete.
-
In the list, locate the file. The file name and file type will be displayed.
-
Tap the kebab menu (⋮) next to the file.
-
Tap Delete attachment.
-
A confirmation message will be displayed:
-
Tap Yes, Delete to confirm and delete the file
-
Tap No, Cancel to exit without deleting
-
-
A confirmation message will be displayed if the deletion is successful.
Delete folder
-
Navigate to the Attachments tab, as described in the previous sections.
-
Drill down to the location containing the folder you want to delete.
-
In the list, locate the folder. The folder name will be displayed.
-
Tap the kebab menu (⋮) next to the folder.
-
Tap Delete folder.
-
A confirmation message will be displayed:
-
Tap Yes, Delete to confirm and delete the folder
-
Tap No, Cancel to exit without deleting
-
-
A confirmation message will be displayed if the deletion is successful.
Download attachment
-
Navigate to the Attachments tab, as described in the previous sections.
-
Drill down into the folder containing the file you want to download.
-
In the file list, locate the file. The file name and file type will be displayed.
-
Tap the kebab menu (⋮) next to the file.
-
Tap Download attachment.
-
The file will be downloaded and made available in your device’s file manager.
Rename attachment
- Navigate to the Attachments tab, as described in the previous sections.
- Drill down into the folder containing the file you want to rename.
- In the file list, locate the file. The file name and file type will be displayed.
- Tap the kebab menu (⋮) next to the file.
- Tap Rename attachment.
- Enter the new file name for the attachment and tap save.
- A success or error message will be displayed to confirm the outcome.
Rename folder
-
Navigate to the Attachments tab, as described in the previous sections.
-
Drill down to the location containing the folder you want to rename.
-
In the list, locate the folder. The folder name will be displayed.
-
Tap the kebab menu (⋮) next to the folder.
-
Tap Rename folder.
- Enter the new name for the folder and tap save.
- A success or error message will be displayed to confirm the outcome.