View your Tasks to keep track of all the ongoing work you and your teammates have to ensure that all work is completed on time and that time is logged accurately. Edit your Tasks in order to reassign the manager or assignee, update your Task Status, change your start or due dates, or to add a budget. Complete your Tasks when all time and work have been logged in order to let the Task Manager know that the job is done, before you move on to the next Task.
Using this guide, you can:
View a Task
Viewing Tasks is vital to keeping track of the work you have been assigned, so there are a variety of ways to find a Task and view it.
To view a task by Searching:
-
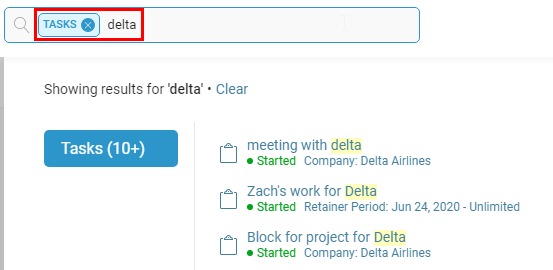
In the Search bar, start typing Tasks. You can press tab to auto-fill, then search, once the option appears.
-
 Enter Keywords of the Task you are searching for, or enter a Company name.
To view a task on the Task Board:
-
View your Task Boards by clicking on the Tasks button on the Navigation bar at the top of Accelo. Clicking Assignee will take you to a customizable list of Tasks sorted by who they are assigned to. Clicking Deadline will show all of the Tasks assigned to you sorted by Due Date. Clicking Status will sort your Tasks by their status, Pending, Accepted, Started, or Completed. Learn more about the Task Board.

-
Click on the Name of the Task you wish to view.
To view a task on your Schedule:
-
Click on the Schedule button on the Navigation bar. Select My Schedule from the drop-down menu.

-
Scroll to the Schedule Work section.

-
Click on the Name of a Task you wish to view. They are in order by their due date, soonest to furthest away.
To view a task on the Tasks Stream of a page:
-
Go to any Company, Sale, Ticket or Project page and click on the Tasks tab.

-
Click on the Name of a Task you wish to view.
Edit a Task
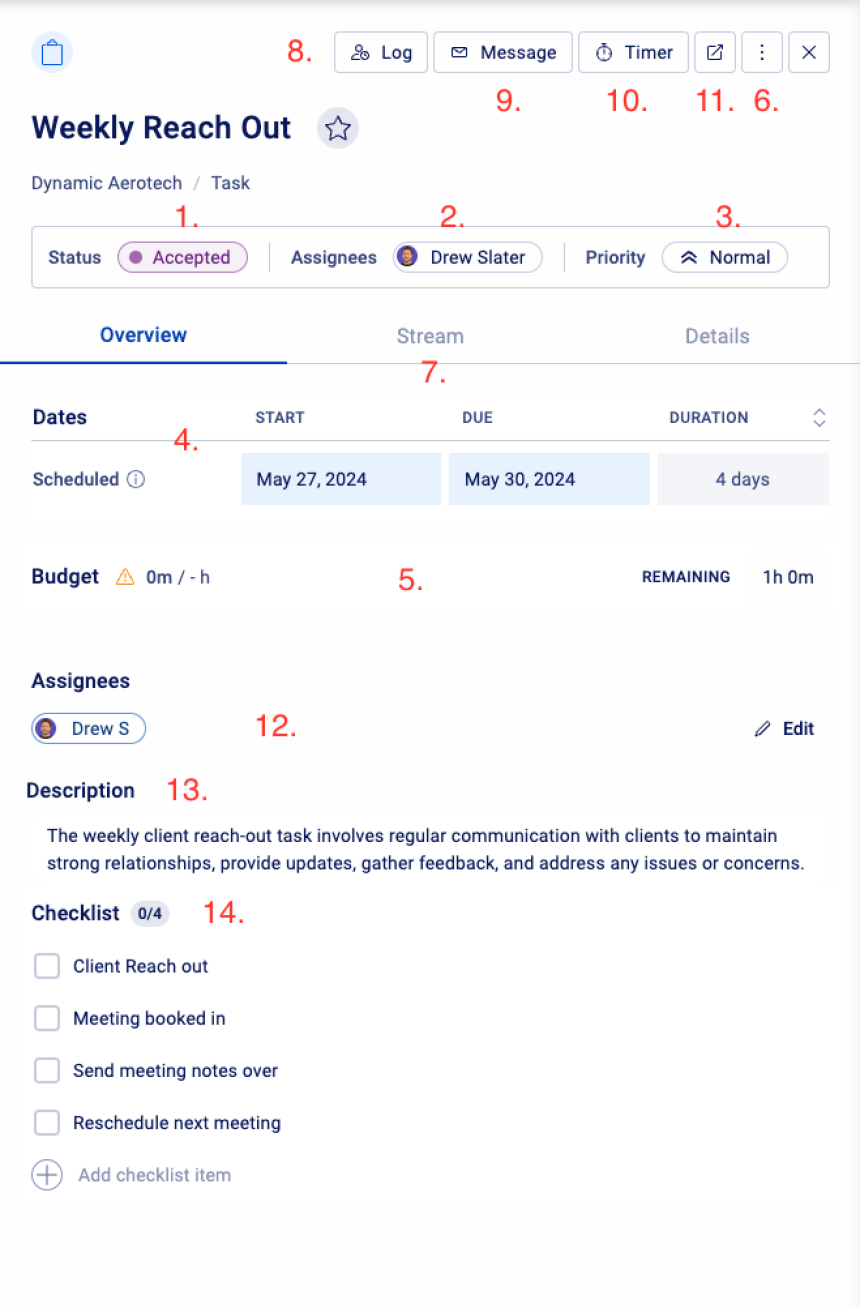
When viewing a Task draw, a number of details will be visible. The Stream history will be available for you to see every activity logged on the Task. You can also see the description in case there are more details or instructions provided. The Task Manager is also shown towards the top of the Task draw.
Details you can edit on a task include:

Overview Tab:
-
Status: The Status of the Task, to show where it stands. From Pending to Accepted, Cancelled, or Completed and otherwise.
-
Assignee(s): The primary individual assigned to complete the Task. Generally this should be the individual in charge of logging most, if not all of the work on the task. Additional assignees can also be added if required.
When users create Tasks in Accelo, they will have the ability to set a ‘Primary’ assignee as well as ‘Additional Assignees'. These assignees will be displayed across v4, wherever Accelo currently display Tasks. These assignees will be editable across the panels & screens they are displayed in, enabling a seamless modification experience.The first iteration of Multi-Assignee will showcase Task Rates & Auto-scheduling according to the Primary assignee, while enabling all assignees to log time against task, simplifying budget tracking for managers.
-
Priority: Update the priority of the task to easier identify the importance of a task from many different list views and boards within Accelo.
-
Dates: While the Start and Due date can be set when you create the task, they can also be edited after the task is created and started.
-
Budget/Time Estimated: The estimated time it would take to complete the Task. Logged/Remaining work will show in the bars below
-
Event: You can see and add/edit the scheduled work currently booked to your users. When more than one person needs to work on a Task, we recommend using the create event feature, found within the kebab menu, more details on the event are located in the Stream (7.)
-
Stream: View a list of all the activities logged against this task, with an option to export it in a spreadsheet.
-
Log Time: Have a modal to log time immediately pop up to make a quick time entry.
-
Create Message: Create an activity to log time and show work you have completed on a task.
-
Start A Timer: Have a timer running at any time while you are working on a task to log time accurately for billing.
-
Open in new tab: Expand the task into a new tab to see the full details.
-
Assignee(s): The primary individual assigned to complete the Task. Generally this should be the individual in charge of logging most, if not all of the work on the task. Additional assignees can also be added if required.
-
Description: Inline edits can be made to add or remove more details to the tasks description
-
Checklist: These are Checklists required for the Task. Your key to-do items to ensure the Task is completed properly.
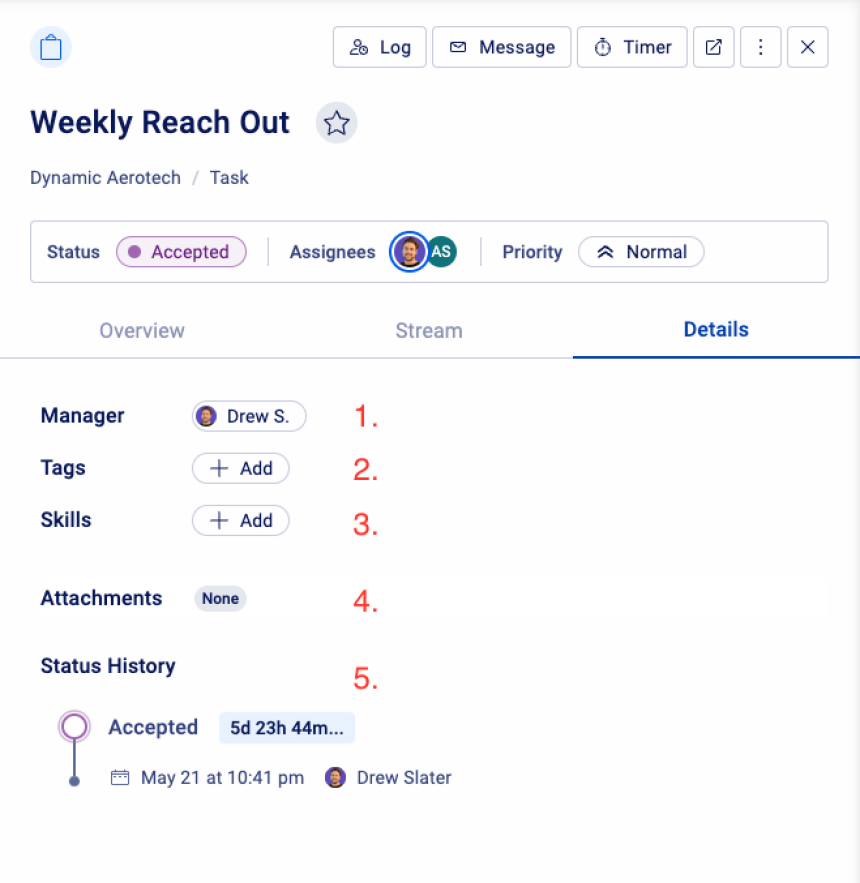
Details Tab:

-
Manager - The Manager is the individual expected to be in charge of the Task. Often times they are the same as the Assignee. They can be set to receive notifications on the Task.
-
Tags: Add Tags for superficial flagging for filtering on your Task Lists.
-
Skills: Add Skills required for the Task to be able to quickly map out skill-required Tasks to the appropriate users who have those Skills.
-
Attachments: View your attachments on the Task.
-
Status History: A audit of the different status the task has been processed through.
Complete a Task
Keep track of the Tasks you’ve completed in order to ensure that all of your work is accurately shown and time is logged correctly. Completed Tasks are essential to your team’s work and communication.
To understand how to Complete a Task, learn how to Manage Your Task Status.
Pause a Task
Have an unexpected priority come up, causing your Project Plan to be put on hold? Utilize the pause task feature for your milestones & tasks to ensure that your plan doesn't go awry!
Pausing a task will actually ensure auto-scheduled and committed time for that task will be cleared from the assignee's schedule (plus any other users who had time committed to that task). The time remaining on the task won't be removed though - just hidden away until the task is resumed.
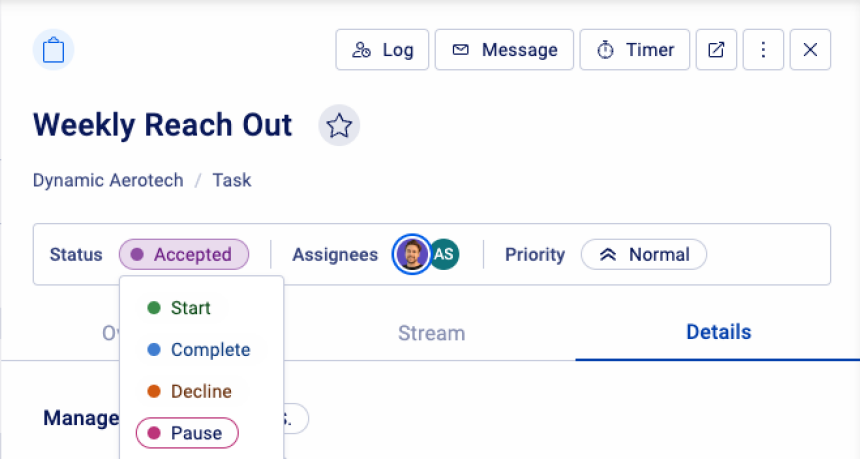
To Pause a Task, simply click status from the task list or to open the Full Task details, then click Pause in the Status bar.


To resume the Task, simply hit the Resume option in the Status bar.
NOTE: Pausing a Task will remove the Committed Time on that Task. Once the Task is re-activated, the time will need to be returned as auto-scheduled time.


