Optimize your lead generation efforts, increase your lead response times, and use better data accuracy to increase retention and conversions with Accelo’s Sales activity tracking.
Using this guide, you can:
Time Tracking with Accelo
By having your own space to track your sales, you can also record notes, send emails and upload documents without cluttering up the company record.
Log internal Sales effort
Easily log your sales efforts directly against the relevant Sale to keep track of all of the work you put into closing an opportunity. Add other members of your team to keep them looped into the work you are completing.
To log an internal note:
- Click + Add Activity against the task.
- Select Create a Note from the activity list.

- Notes are internal, therefore can't be sent to Clients. However, when entering a note, you can choose to attention a staff member, meaning they will get a copy.

- Subject - Summarizes the notes which you've entered below, and is used as the email subject for any emails sent enter a subject line that briefly describes the work you performed or summarizes the notes you entered in the message body below.
- Body - Enter the details of the work which you performed.
- Attach files to your activity with either the paperclip or the folder icons at the bottom left of the activity window. The paperclip icon lets you attach files from your computer and the folder icon lets you attach files already uploaded into Accelo.
- The Timer starts as soon as you open the activity window. You can pause, restart, and/or manually enter hours, minutes and seconds.
- While the billable checkbox appears for activities logged against Projects, Issues and Retainer Periods, it is disabled for activities against Sales because sales, on their own, are not billable.
- Use the Class field (the journal icon) to indicate the class of the work and time you are entering. For instance, you might have an activity class called "Business Development".
- The Viewable button (lock icon) lets you adjust the privacy settings for the activity. By default, the activity visibility is dictated by your Client Relationship or your default visibility settings located under the User Preferences menu. However, you can override those settings by choosing Confidential or Private from the menu.
- Last, you can set the Priority for the activity, by clicking on the lightning bolt icon.
To save the activity and send an email notification, including any attachments, to the appropriate staff, hit Save.
Send External Correspondence to your Clients
By sending your emails, scheduling your meetings, and logging your calls directly to the related Sale, you and your team can keep track of the full scope of sale efforts to close the deal. Every time you open the sale, find all of your whole team's previous correspondence on the Stream, saving you time on tracking down a team member to find out "where you are" on that Sale.
To send external correspondence:
- Click + Add Activity against the task.
- Select the Send an Email, Schedule a Meeting, Log a call, or Log a Postal from the activity list.

- To include a Company Contact, you must first add that person as a contact under that Company. If they are already a contact in the system, just type their name in the "To" field

- Subject - Subject for the email, meeting or phone conversation.
- The message body is where you can enter the message you wish to send to your recipients.
- Attach files to your activity with either the paperclip or the folder icons at the bottom left of the activity window. The paperclip icon lets you attach files from your computer and the folder icon lets you attach files already uploaded into Accelo.
- The Timer starts as soon as you open the activity window. You can pause, restart, and manually enter hours, minutes and seconds.
- While the billable checkbox appears for activities logged against Projects, Issues and Retainer Periods, it is disabled for activities against Sales because sales, on their own, are not billable.
- Use the Class field (the journal icon) to indicate the class of the work and time you are entering. For instance, you might have an activity class called "Business Development".
- The Viewable button (lock icon) lets you adjust the privacy settings for the activity. By default, the activity visibility is dictated by your Client Relationship or your default visibility settings located under the User Preferences menu. However, you can override those settings by choosing Confidential or Private from the menu.
- Last, you can set the Priority for the activity, by clicking on the lightning bolt icon.
To send the email notification, including any attachments, to the appropriate staff, hit Save.
Sale Activity Chart
The Sale Activity chart at the bottom of the sales screen shows you the correlation between the time logged and activities added. Easily see the productivity of your sale team and whether or not the effort is worth the payout.

See how many hours have been logged and how many activities you have created. See when most of your time has been logged versus the activities you've created on the sale. You will see this graph all around Accelo within Issues, Projects, and here in Sales.
Optimize your lead generation efforts, increase your lead response times, and use better data accuracy to increase retention and conversions with Accelo’s Sales activity tracking.
Using this guide, you can:
Time Tracking with Accelo
By having your own space to track your Sales, you can also record internal notes, send messages and upload documents without cluttering up the company record.
Easily log your Sales efforts directly against the relevant Sale to keep track of all of the work you put into closing an opportunity. Add other members of your team to keep them looped into the work you are completing.
Internal Correspondence with your Team:
Messages:
Send a message to your internal team members. Use the + Message button on the top Navigation Bar.
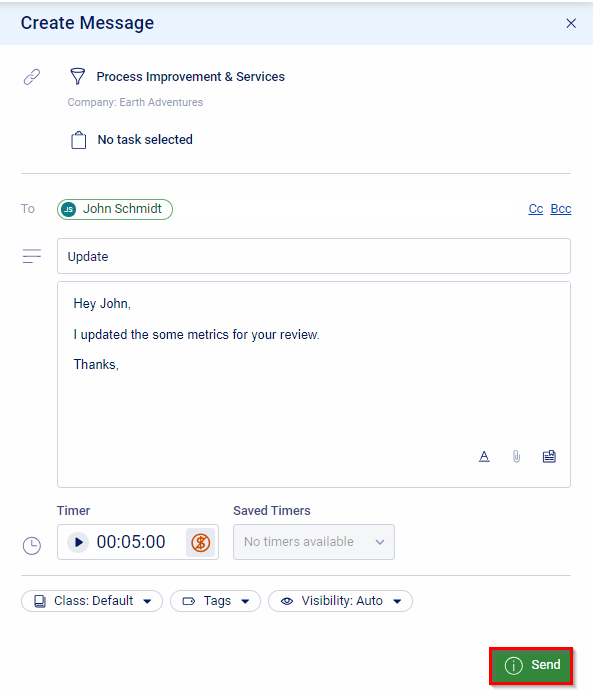
 You can link the message to a Task, Set the Recipients, Subject, Body, Time, Link to Saved Timers, Class, Tags, and Visibility. When you have set all relevant details, simply press Send.

Log Work:
Retroactively log work you’ve completed on the Sale by clicking the Log Work button.

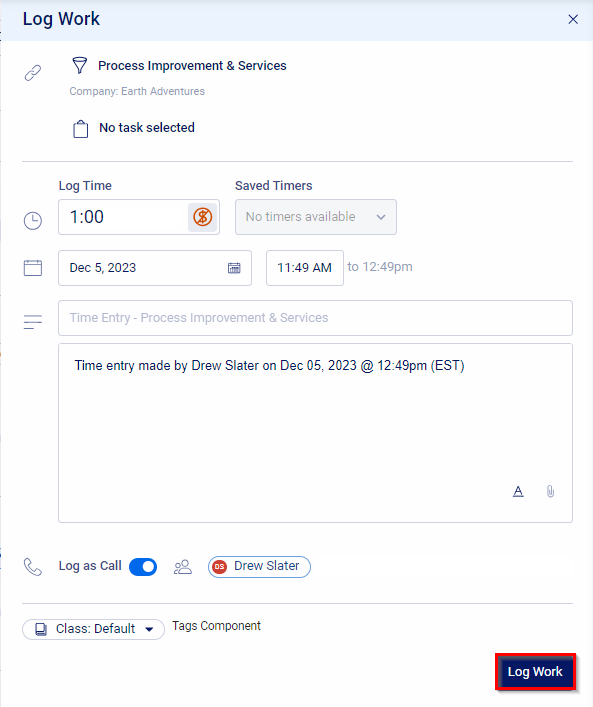
You can link the message to a Task, Set the Time, Link to Saved Timers, Change the Logged For Date/Time, Enter a Description/Body, Log as a Call, Set the Class & Tags. When you have se all relevant details, click Log Work.

Timers:
Record your work in real time. Instantly start a timer against the Sale by clicking the Timer button in the Navigation Bar. Keep this running for the duration of your session, then log your work by Completing your Timer.

External Correspondence to your Clients
By sending messages and scheduling events, you and your team can keep track of the full scope of sale efforts to close the deal. Every time you open the sale, find all of your whole team's previous correspondence on the Stream, saving you time on tracking down a team member to find out "where you are" on that Sale.
Messages:
Send a message to your Sale Contact. Use the + Message button on the top Navigation Bar.
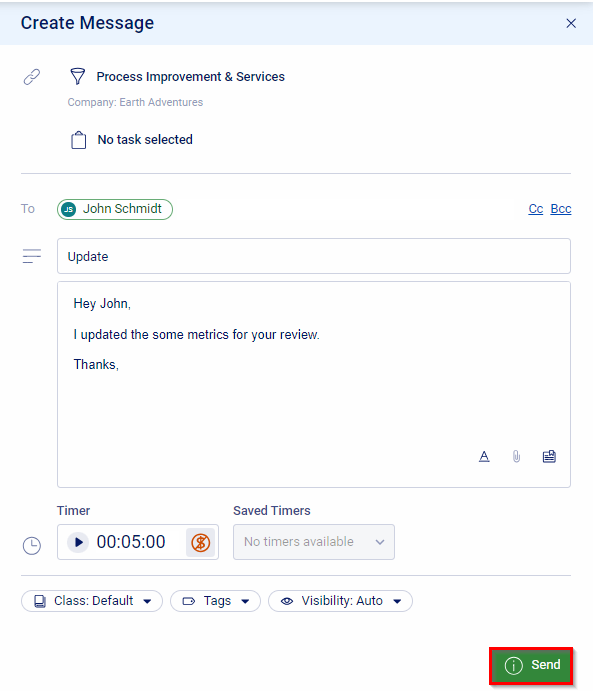
 You can link the message to a Task, Set the Recipients, Subject, Body, Time, Link to Saved Timers, Class, Tags, and Visibility. When you have set all relevant details, simply press Send.

Events:
Create an Event using the + Event button to collaborate with your client on the Sale.

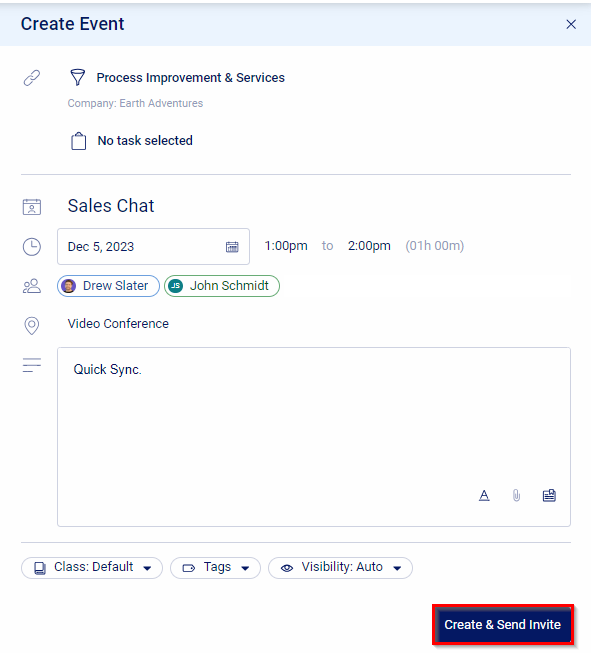
You can set the Title, Date, Time, Attendees Location, Description, Class, Tags, and Visibility When you have filled in all relevant fields, select Create & Send Invite.

![]() You can link the message to a Task, Set the Recipients, Subject, Body, Time, Link to Saved Timers, Class, Tags, and Visibility. When you have set all relevant details, simply press Send.
You can link the message to a Task, Set the Recipients, Subject, Body, Time, Link to Saved Timers, Class, Tags, and Visibility. When you have set all relevant details, simply press Send.
![]()

![]()
![]() You can link the message to a Task, Set the Recipients, Subject, Body, Time, Link to Saved Timers, Class, Tags, and Visibility. When you have set all relevant details, simply press Send.
You can link the message to a Task, Set the Recipients, Subject, Body, Time, Link to Saved Timers, Class, Tags, and Visibility. When you have set all relevant details, simply press Send.


