The Weekly Timesheet is your one-stop location to find all your scheduled tasks for the week, all time that you have logged, and helps you to automatically track how you spend your time.
Log in every morning, and visit your Timesheet to see what Tasks are assigned for the day. Visit your Weekly Timesheet when your day is complete, and make sure you’ve properly logged all your time for the work you’ve done.
Using this guide, you can:
View the Weekly Timesheet
Hover over the Time icon on the Navigation Bar and select Weekly from the Timesheets section.

On the left is your List of Client Work, including client names, projects, tickets, and a list of all of your scheduled tasks. On the right is a Weekly Overview of your logged time separated by day, as well as suggested task entries.
Click on the name of your scheduled Task on the left, and find all the details of the work you need to complete.
Logging your Work with Automated Capture
Accelo helps you keep track of your work by automatically filling in your timesheet for you!
When a task, for example, is given a time budget and assigned to a specific user, it will appear in the Weekly Timesheet for the relevant week. For example, if a task is assigned to John Smith for two hours, and it is scheduled to start on June 2, then the task will appear in his Weekly Timesheet for the week of June 2.
NOTE: If a task has a scheduled start and due date from a previous week, but it has not been completed yet, the task will still appear in the user's Weekly Timesheet. This is to serve as a reminder that the task has yet to be completed, thus prompting the user to log time for that work.
Here's how it works across three key areas of your business you live in every day: emails, meetings and tasks.
Email capture: Accelo tracks all the emails sent to your clients and rolls-up those minutes into your timesheet.

Meeting capture: Any calendar appointments you've made through Accelo, G Suite or Microsoft Outlook/Office are also recorded here.
Task Capture: Whether they come from your Accelo account or from your sync'd G Suite or Outlook tasks, you'll find them waiting in your timesheet.

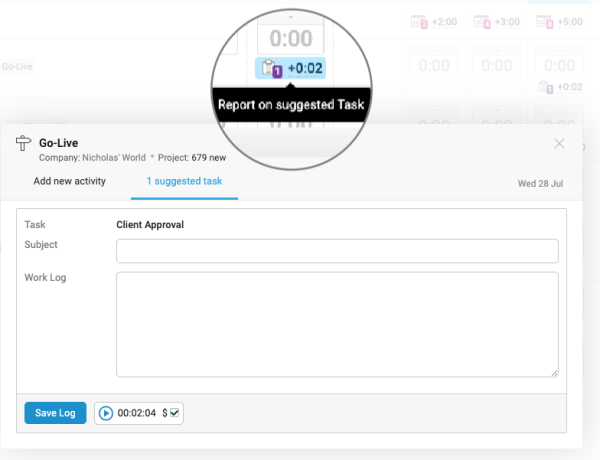
If you're the kind of person who's often doing client work, you'll be familiar with having milestones, tasks and tickets that need to be worked on for clients, often with budgets and deadlines. Accelo makes it easy to track the time spent on tasks by showing them as "Suggested Tasks" between their start and due dates. To convert these suggest work entries into actual time on your timesheet, simply click on them, confirm the time you want to log, and you're done!

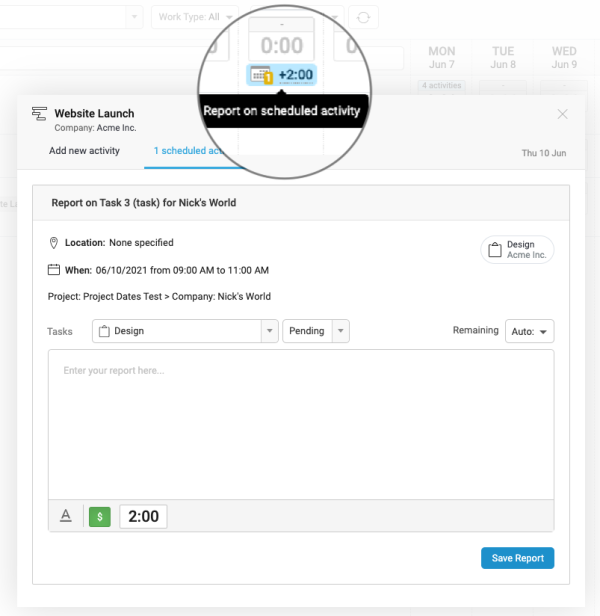
If your manager takes the next step and assigns a number of hours on a given day to work on a task, it will be shown as part of the "Committed Tasks" list, making it easy for you to go back and enter the actual amount of time you spent. Simply click on the committed work entry, confirm the hours you want to log, and you'll convert that committed work into actual work, adjusting budgets automatically and in real time.
Log time with Timers
While automating timesheets can help recover a lot of lost time, the most accurate way to keep track of the time you spend doing client work is to log it as you're doing it.
The Timers feature in Accelo makes real-time tracking fast and effortless. Simply click on the +Create button in the top menu and then "Timer". After you give the timer a name, and a starting amount of time (optional), you can start running it. If you create a new timer, other timers will be automatically paused.

When you're ready to convert a timer into a timesheet entry, you can simply click on "Complete" and log your time.
Manually Enter Time for Work
The left-hand side of your timesheet contains a list of all types of client work that the timesheet already knows about. But what if the work you want to enter time against isn't already there? The good news is that finding and adding a new row is easy. All you have to do is type in the name of what you want to log work against in the top left search box and you'll be able to see a super-fast search across all your client work.

Once you've added this new row, you can easily type in the number of hours and minutes spent on that client work into the relevant days. Here you'll see a handy feature, where the total time logged updates in real-time.
Between excavating data and having to reinvent your week, it’s not a surprise why filling in timesheets is a universally dreaded task. In a world of automation, timesheets should be easy.
Accelo takes a new spin on the traditional timesheet with the easiest and most intuitive way to track time. It intelligently captures your client touchpoints so that reporting your time at the end of the week is only a matter of tweaking numbers.
Detailed Time Entry Mode
Once enabled, when you click on a cell to log time, you'll always get the pop-up so you can see & edit the default Work Log subject & description:
In this new detailed mode, there's actually 2 options for how the Subject and Description fields can work:
- Detailed (Optional): as shown above, where Subject & Description are more like place-holder text. If left untouched, we'll save the work-log with that text, otherwise you can just click to edit it.
- Detailed (Required): this forces the user to always type something in the Subject & Description fields - much like a standard "Create Activity" process.
For those wanting to access other activity-related fields, just click the More worklog details link to add extra details - this is especially handy for folks who also have to log their start and end times (such as US Federal Govt Contractors):
- Class - let's you select the activity class, which can be helpful for categorizing time as internal admin, sales preparation, customer service, and so on.
- Start/End Time - helpful for consultants or contractors who need to record precisely when they were onsite with the customer or engaged in a client task.
- Tasks selector (which only applies when tasks are available for the milestone/sale/issue/etc that you're working on) - besides letting you toggle the Work Log to another task, you can update the task status and estimated time remaining with ease!
Configuring the new Timesheet Entry Modes
As an administrator user, open the Settings > Activities & E-mails > Settings:

- Time Increment (min): The automatic time suggestion for captured e-mails.
- Work Log Subject: The default template for the Subject.
- Work Log Body: The default template for the details/body of the time entry.
- Quick Timesheet Entry (Classic): All you need to input is Time, no other details are necessary before it is logged.
- Detailed (Optional): The Subject & Description are more like place-holder text. If left untouched, we'll save the work-log with that text, otherwise you can just click to edit it.
- Detailed (Required): This forces the user to always type something in the Subject & Description fields - much like a standard "Create Activity" process.
Below that you'll see an Override Timesheet option. By default this is unchecked, which means the Mode you've selected above will apply to all users. When the override is enabled, it allows each user to choose their preferred Timesheet Entry Mode via their Preferences screen.

