Bulk Invoicing is ideal for when you have a lot of clients to bill for a lot of work, such as at the end of a billing cycle. Filter and search through all of your clients and all of the work done for them, to find the specific types of work you want to invoice for. Use the Bulk Invoice wizard to quickly create and send invoices to all of your clients quickly!
Using this guide, you can:
Bulk Invoicing
Find the Bulk Invoicing Tool by selecting Companies on the Left Hand Side Menu and selecting Company Billing under the Shortcuts.

Filter Clients and Work
On this page, you will see a table of filters on the left side of the screen, which will display a list of companies on the right when applied.
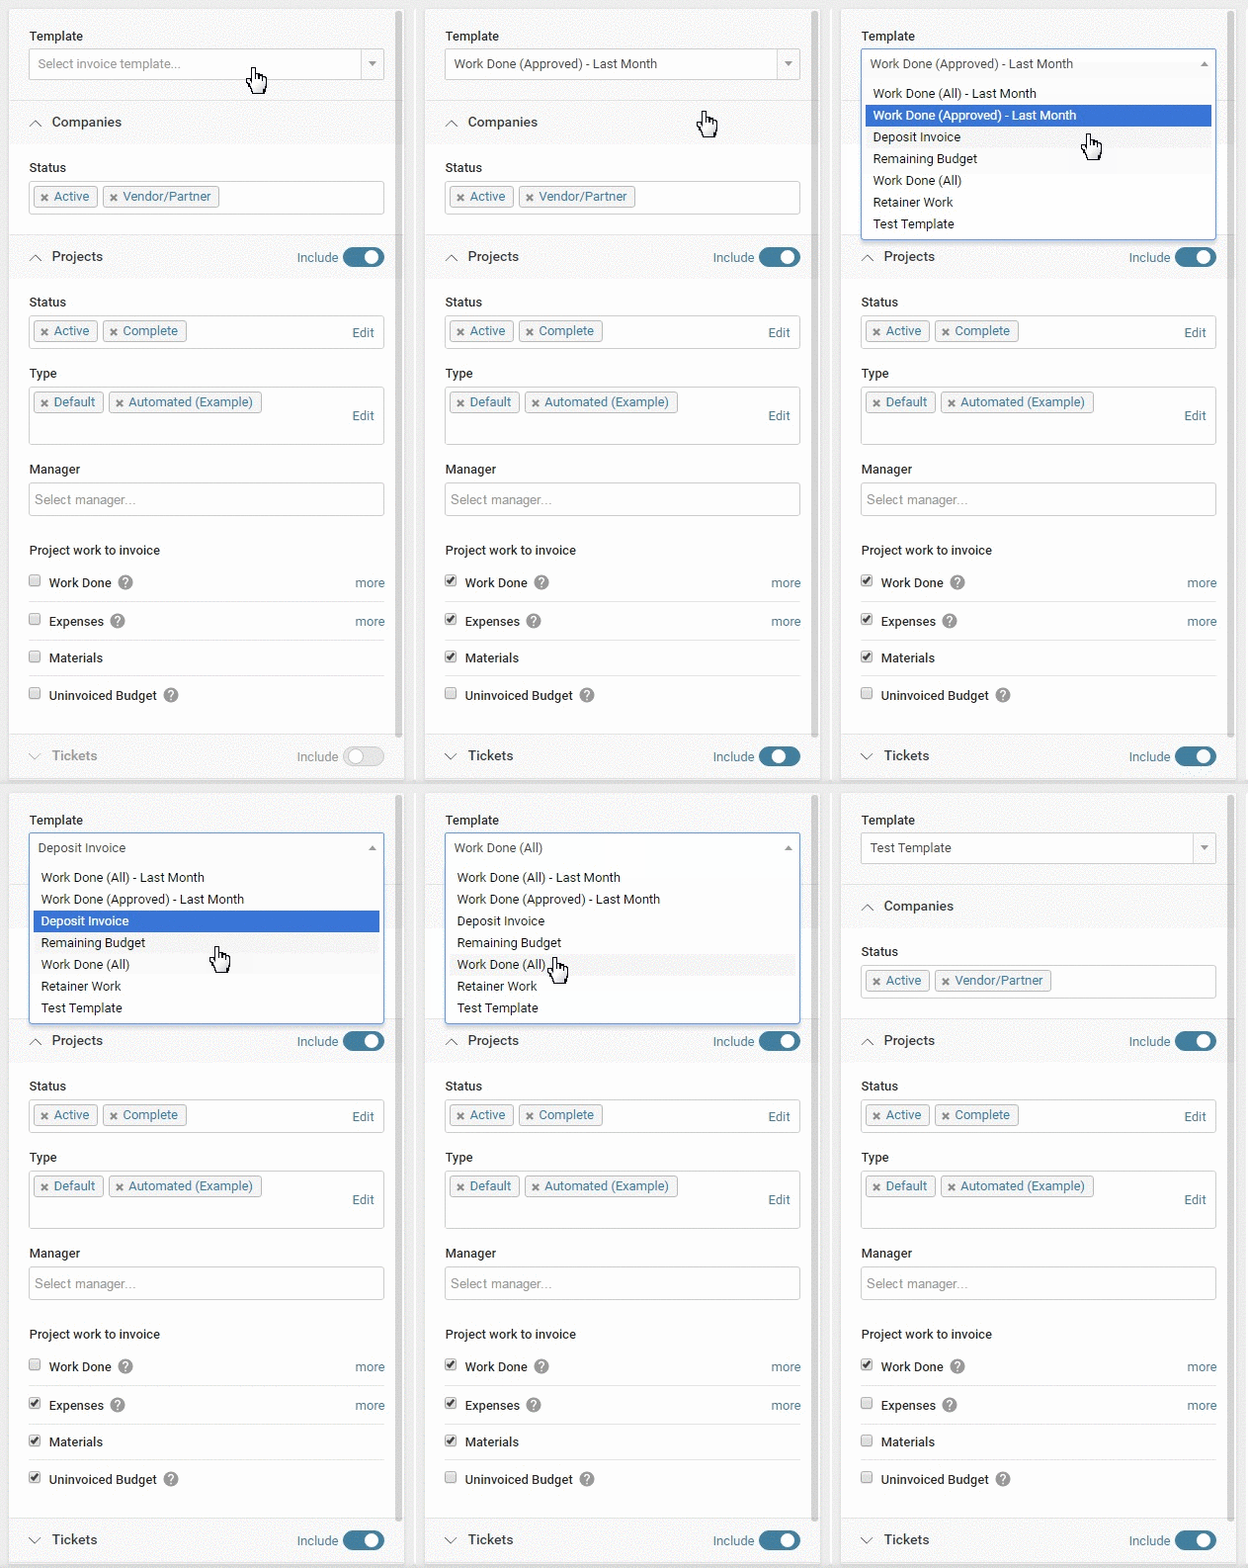
Begin by choosing the Invoice Template you would like to apply. This is the best way to start the bulk invoicing process, as it will automatically set the filters for the objects you wish to bill. For example, if you have a template set to bill only approved work in the last month, these filters will automatically be applied to Projects, Tickets, and Retainers settings below.
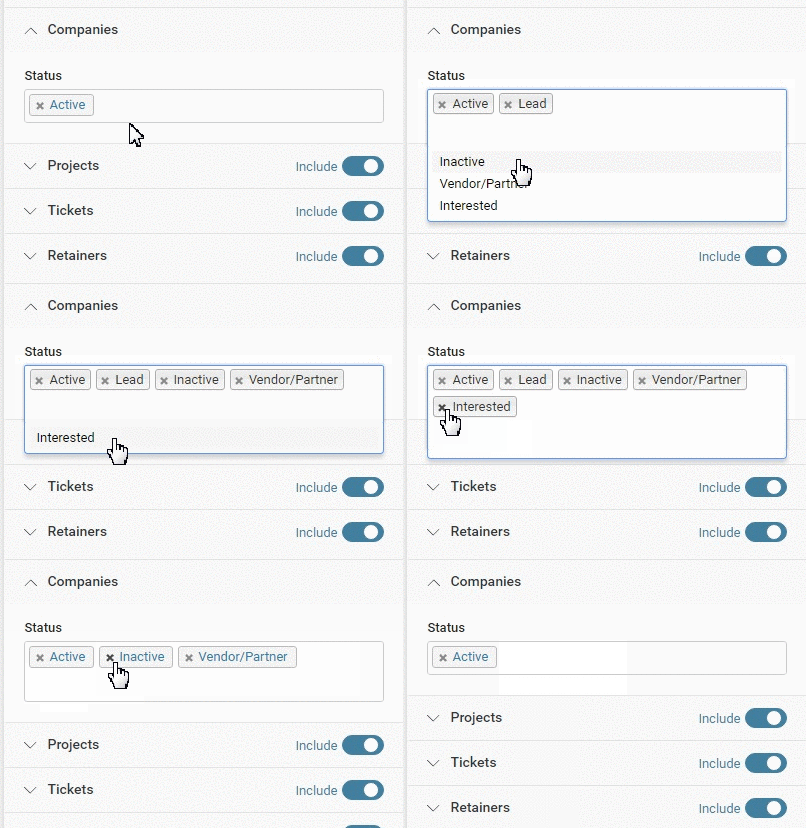
Next, choose the company statuses you want to apply. You can add statuses by clicking in the text box and selecting from the drop-down list, or choose to remove them by clicking on the x on each status.
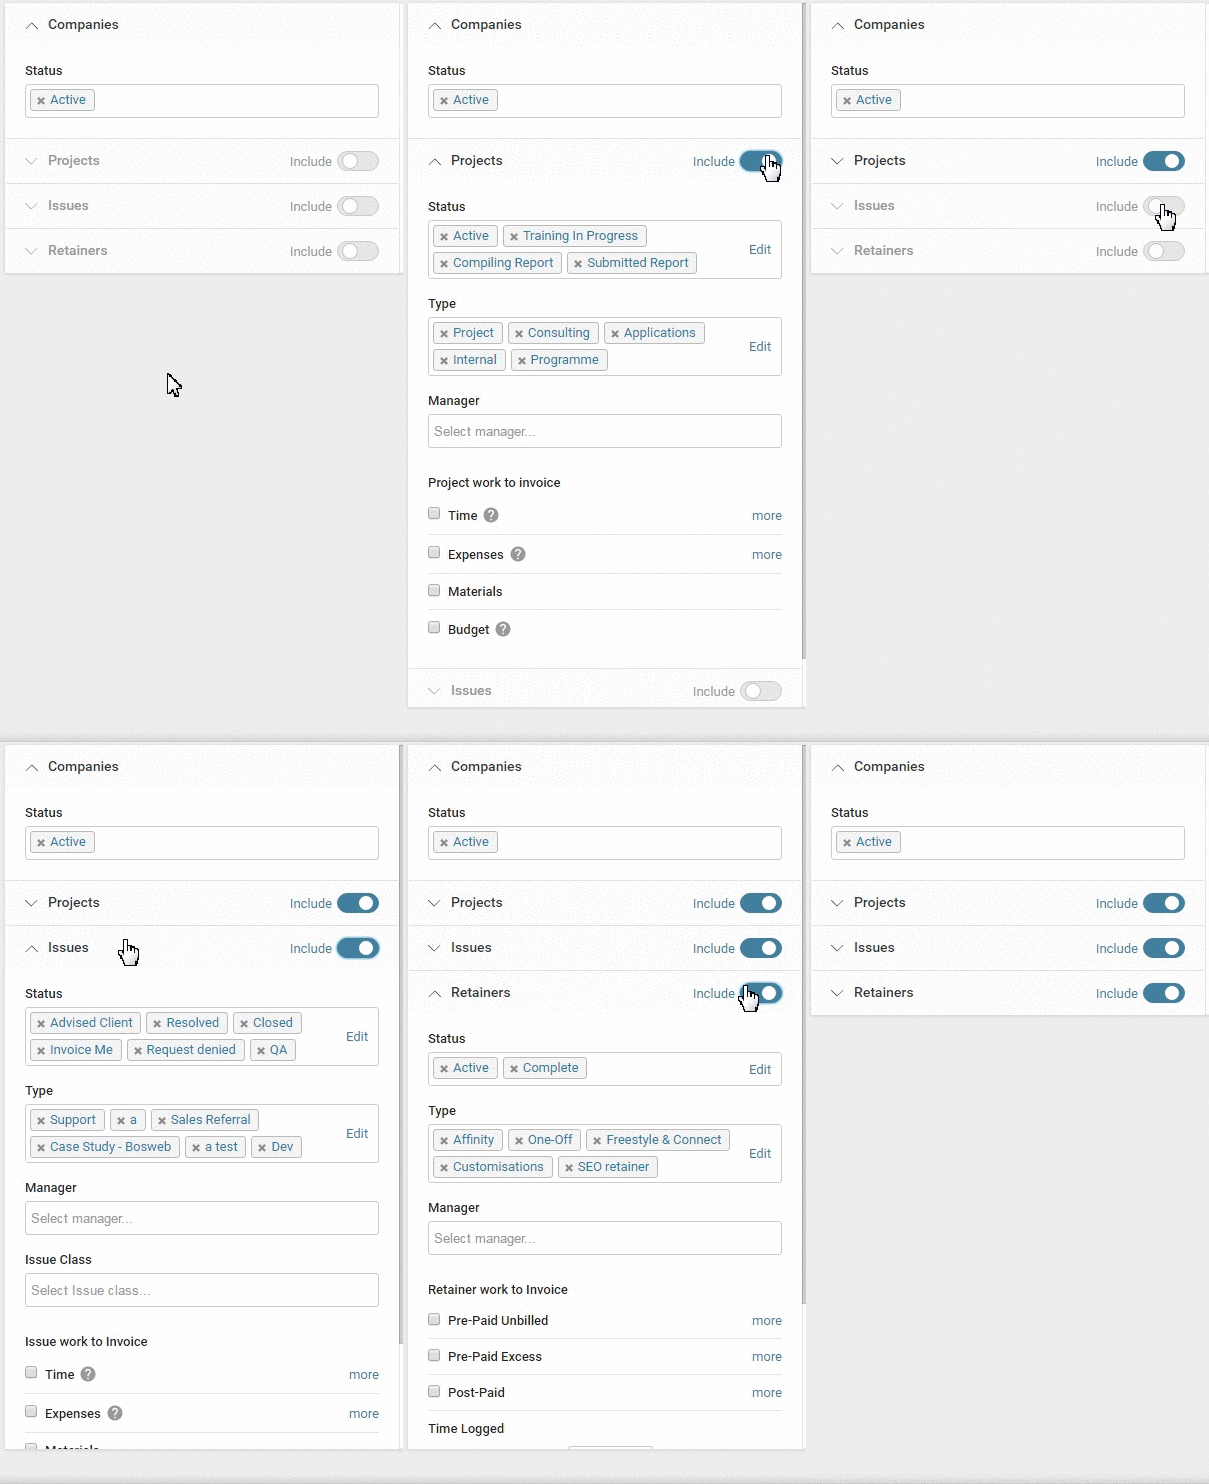
After narrowing down the types of companies you wish to see, you can choose whether you would like to view Projects, Tickets, or Retainers logged against these companies by toggling the Include switch beside each type of item.
Projects
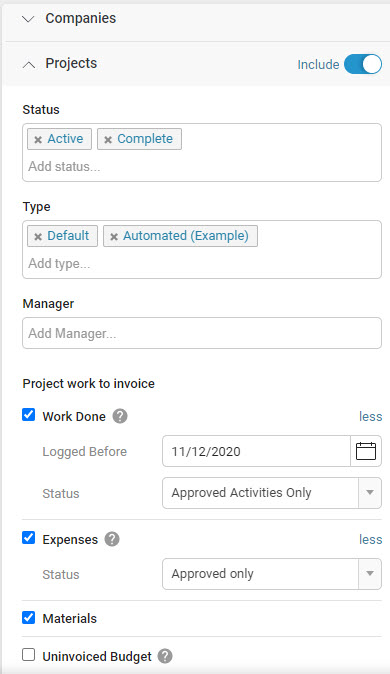
Under Projects, choose from some more specific filters to narrow down which Projects will appear.
-
Status: The Status of the Projects you wish to include in the invoice.
-
Type: The Types of Projects you wish to include in the invoice.
-
Manager: Search for a specific Manager whose Projects you wish to include in the invoice. Choose as many Managers as necessary.
-
Project work to invoice: Choose the type of work under the Project that you wish to include in the invoice.
-
Time:
-
Date Logged: Choose the range of dates for the time logged against the Projects you wish to invoice for.
-
Status: Choose the status of the work logged against the Projects, either Approved Activities Only, Unapproved Activities Only, or All Activities.
-
-
Expenses: Choose whether to include Expenses which are Approved Only, or All Expenses.
-
Materials: Choose whether to include Materials logged against Projects.
-
Budget: Choose whether to include Projects that have a Budget which has not been invoiced yet.
-
Tickets/Issues
Under Tickets, choose from some more specific filters to narrow down the Tickets that will appear.

-
Status: The Status of the Tickets you wish to include in the invoice.
-
Type: The Types of Tickets you wish to include in the invoice.
-
Manager: Search for a specific Manager whose Tickets you wish to include in the invoice. Choose as many Managers as necessary.
-
Ticket Class: Choose the Ticket Classes you wish to be included.
-
Ticket work to invoice: Choose the type of work under the Ticket that you wish to include in the invoice.
-
Time:
-
Date Logged: Choose the range of dates for the time logged against the Tickets you wish to invoice for.
-
Status: Choose the status of the work logged against the Tickets, either Approved Activities Only, Unapproved Activities Only, or All Activities.
-
-
Expenses: Choose whether to include Expenses which are Approved Only, or All Expenses.
-
Materials: Choose whether to include Materials logged against Tickets.
-
Budget: Choose whether to include Tickets that have a Budget which has not been invoiced yet.
-
Retainers
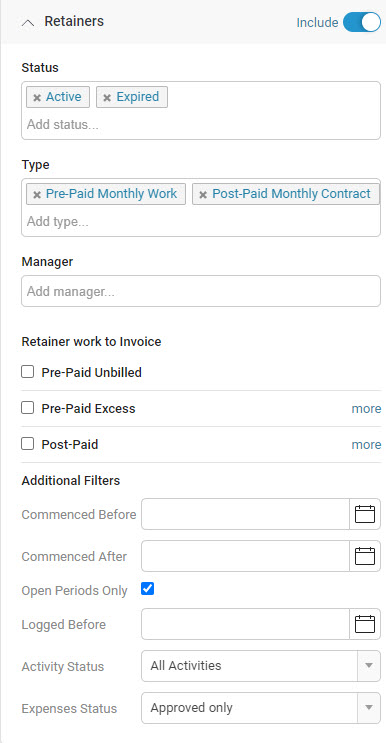
Under Retainers, choose from some more specific filters to narrow down the Retainers that will appear.
-
Status: The Status of the Retainers you wish to include in the invoice.
-
Type: The Types of Retainers you wish to include in the invoice.
-
Manager: Search for a specific Manager whose Retainers you wish to include in the invoice. Choose as many Managers as necessary.
-
Retainer work to invoice: Choose the type of work under the Retainer that you wish to include in the invoice.
-
Pre-Paid Un-billed: Choose whether to include unbilled work logged against a Pre-Paid Retainer Period. This can be narrowed down by the Period Commence Date.
-
Pre-Paid Excess: Choose whether to include excess work that was logged against a Pre-Paid Retainer Period. This is useful if you ended up doing more work than was budgeted for a Pre-Paid Retainer Period. Choose whether you wish to include Periods which are Expired Only or Closed Only.
-
Post-Paid: Choose whether to include Post-Paid Retainers Periods and choose whether to include Periods which are Expired Only or Closed Only.
-
-
Time Logged: Choose the type of logged time you wish to include in the invoice.
-
Date Logged: Choose the range of dates for the time logged against the Retainers you wish to invoice for.
-
Status: Choose the status of the work logged against the Retainers, either Approved Activities Only, Unapproved Activities Only, or All Activities
-
-
Expenses: Choose whether to include Expenses which are Approved Only, or All Expenses.
Once you have chosen all of the filters you wish to apply, select Apply Filters at the bottom of the screen, and these filters will be reflected in a list of companies on the right side of the screen. On each company line, you will be able to see the total number of Projects, Tickets, or Retainers you will be invoicing them for.

Select the companies you wish to invoice by selecting the check box next to them. You may also choose to select all companies in this list with the check box at the top of the list.
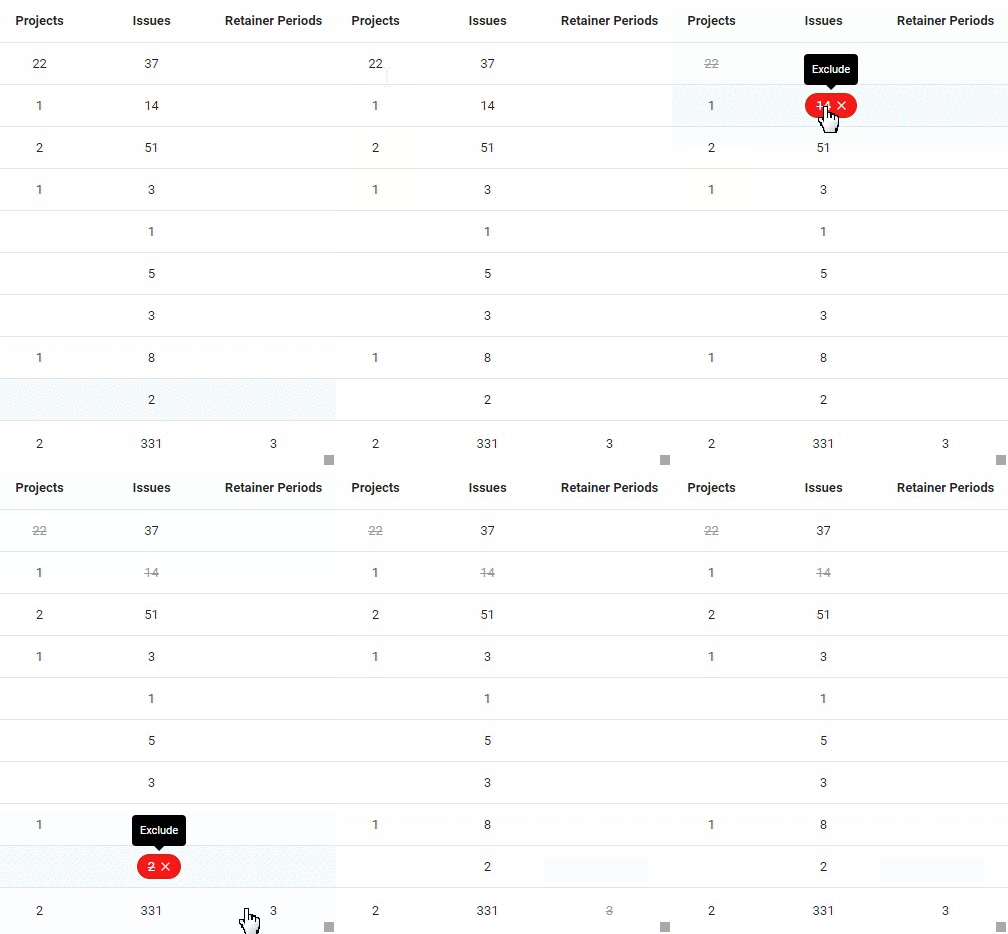
If there are companies on this list that you wish to invoice, but do not want to include a specific type of item, you can choose to exclude all Projects, all Tickets, or all Retainers that are listed, simply by clicking on them.
Click Start Invoicing Wizard to begin the invoicing process for these companies!
Create Bulk Invoice
There are many things to view and edit on this page, so that you can ensure you are billing your clients for the correct work, and for the correct amount.
View the Bulk Invoice Screen
-
The Company Name.
-
Sub-total: The current total amount you will be billing the company for, if you did not make any changes to the information below. This amount will update as you make edits.
-
Consolidate Invoices: Invoices are separated out by the Contact at the Company who will be receiving the Invoice. If you prefer, you can choose to consolidate these Invoices by choosing to have Invoices for one Contact sent to another Contact.

-
Recipient: The name of the Contact who will be receiving this Invoice. This will be the Primary Contact for the Item you are billing for.
-
Invoice Title: The title of the Invoice, as it will appear in your records. This is based on the Template you chose on the previous Filter page, but can easily be edited for each Invoice.
-
Raised: The date you would like the Invoice to be created. This will default to the current date, but can be edited to a future date if necessary.
-
Due: The date you would like the Invoice to be paid by. This will default to 14 days from the current date, but can be edited to a future date if necessary.
-
Notes: Click this button to add Internal Notes and Notes for the Client.
-
Template: While all the Invoices in the Bulk Invoice Wizard will default to the Template you chose on the previous page, you can choose a different Template for each individual Invoice, as necessary, by selecting one from the drop-down list.
-
Edit & Preview PDF: While the PDF for the Invoice will be formatted based on your Invoice Template, you can choose to click this button to view the PDF and edit it as necessary, if a Client or Contact has specific needs. Learn more about editing PDFs. [add link]
-
The list of line items which will be included in this Invoice. Here you can see what is being invoiced and the total amount that the client will be charged for that work.
Click on the green check mark beside each line item to remove it from the Invoice. Click on the line item itself to view and edit more details.
-
Sub-total: The sub-total for this particular Invoice.
-
Include activities for: Choose the types of work you wish to include in this Invoice. Un-check the box next to a type of work to remove its activities from this Invoice.
-
Show activity settings: Click this button to open up more setting options for the types of activities you want to appear on this Invoice.
-
Viewing: The name of the Company whose work you are currently viewing. Click switch to change to another Company which you selected on the previous screen.
-
Progress: This progress bar shows how far you have made it through the Bulk Invoice process, by indicating how many total Companies you have completed Invoicing for.
-
Action Invoices: Choose how you want to proceed with the Invoices you are currently viewing:
- Create: Create the Invoice, but do not send it yet. This is useful if you need to have someone else at your company approve an Invoice before it is sent to the Client.
- Create & Email: Create a PDF Invoice and automatically send it in an email to the Recipients above.
- Skip: Skip this Company and move on to the next Company on your list.
Edit your Invoices
Edit all of the details of your invoices to ensure that you bill for the correct work, and the correct amount.
First, try clicking on Show activity settings at the bottom of the Invoice you are working on. This section will allow you to choose which details of the line items you wish to have visible on the Invoice by clicking on the blue toggle next to them.

Next, try clicking on a specific line item. This will allow you to view and edit more details of the line items which will be appearing on your Invoice.
Service
Because Services often comprise the majority of the work you will be billing for, Services have the most options available for editing.

Begin by choosing whether to Invoice For work done, a percentage of the budget, or the total remaining budget of the line item. This setting will determine the other settings you can view.
-
Work Done: Invoice for all the work that has been done against this line item.
-
Work Status: Choose whether to include All Work, Work that has been Approved Only, or None.
-
Logged Before: Choose whether to include Work logged before a specific date.
-
Default Service Item: Choose the Service you are billing for against this line item.
-
Activities: Choose whether or not to include Activities logged against this line item to appear on the Invoice.

-
-
Percentage Budget: Invoice for a specific percentage of the budget of this line item.
-
__%: Enter the percentage amount you wish to include. This will default to 100%, but you can choose to bill for 50% of the budget, for example, if you have agreed to bill your client for half now, half later. This will be reflected in the Services listed below.
-
Mark as Invoiced: Choose which Activities you wish to mark as Invoiced after this Invoice is sent. Select either All, Approved Only, or None.
-
Logged Before: Choose whether include Work logged before a specific date.
-
Default Service Item: Choose the Service you are billing for against this line item.
-
Activities: Choose whether or not to include Activities logged against this line item to appear on the Invoice.

-
-
Remaining Budget: Invoice for any part of the budget which has not yet been invoiced. This is useful if you had previously billed for only 50% of the budget for this line item, and now need to bill for the remaining 50%. This will be reflected in the Services listed below.
-
Work Status: Choose whether to include All Work, Work that has been Approved Only, or None.
-
Logged Before: Choose whether include Work logged before a specific date.
-
Default Service Item: Choose the Service you are billing for against this line item.
-
Activities: Choose whether or not to include Activities logged against this line item to appear on the Invoice.

-
Next, edit the Services listed below.

-
Uncheck the box next to each Service to remove it from the Invoice.
-
Description: Edit the description of the Service, if necessary.
-
Itemize: Choose whether you want to itemize line items on this Invoice by Staff, by Rate, or not at all (None). If you choose Staff or Rate, you will not be able to edit the Hours and Rate below.
-
Hours: Edit the number of hours that are being billed for on this Service.
-
Rate: Edit the rate that these hours are being billed at.
-
Amount: The total amount that this Service costs.
-
Tax: The amount of tax applied to this Service item, depending on the tax code of the Service.
-
Total: The total amount that the Client will be billed for this Service.
Click Add new Service line item if you need to add more Services to this line item.

-
Description: Enter the description for this Service and click the checkmark to save it.
-
Hours: Enter the number of hours that are being billed for on this Service.
-
Rate: Enter the rate that these hours are being billed at.
Click the Save button to save this Service, or click the Trash button to remove it.
Material
View and edit the details of the Materials that are logged against this line item.

-
Code/Description: Edit the code/description of the Material, if necessary.
-
Quantity: Edit the quantity of this Material that you wish to bill for.
-
Price: Edit the price of the Material you are billing for.
-
Amount: The total amount that this Material costs.
-
Tax: The amount of tax applied to this Material.
-
Total: The total amount that the Client will be billed for this Material.
Click Add new Material line item if you need to add more Materials to this line item.

-
Service item code or title: Search for the Material you wish to add from your saved Material items. This will automatically fill in the Cost and Price of the Material based on the saved Material item, but this can be edited.
-
Cost: Edit the cost of the Material, if necessary.
-
Quantity: Edit the quantity of the Material you are billing for.
-
Price: Edit the price you are charging the Client for this Material.
-
Amount: The total amount that this Material costs.
-
Tax: The amount of tax applied to this Material.
-
Total: The total amount that the Client will be billed for this Material.
Click the Save button to save this Material, or click the Trash button to remove it.
Expenses
View and edit the Expenses that are logged against this line item.

-
Description: Edit the description of the Expense, if necessary.
-
Quantity: The quantity of this Expense that was logged against the line item.
-
Rate: The rate that this Expense is being billed at.
-
Amount: The total amount that this Expense costs.
-
Tax: The amount of tax applied to this Expense.
-
Total: The total amount that the Client will be billed for this Expense.
